Good Things Come in Threes 🔗
In August last year, Offensive Security announced that it was retiring the long-standing Offensive Security Certified Expert (OSCE) certification and replacing it with three courses, each with their own certification. If you get all three, you are also awarded the new Offensive Security Certified Expert – Three (OSCE3) certification.
While this is undoubtedly a great business decision by Offensive Security - the market loves bundles - how useful are these courses for security professionals? The first of the three courses, Advanced Web Attacks and Exploitation (WEB-300)/Offensive Security Web Expert (OSWE), was already released at that time and is a known quantity. In October 2020, Offensive Security released the Evasion Techniques and Breaching Defenses (PEN-300) course that comes with the Offensive Security Experienced Penetration Tester (OSEP) certification and more recently released Windows User Mode Exploit Development (EXP-301)/Offensive Security Exploit Developer (OSED). The three courses target specific domains and therefore are relevant to different roles in offensive security.
As I had already achieved the OSWE in 2019, I took the 60-day OSEP package from January to February 2021. At the time of writing, this costs $1299. PEN-300/OSEP teaches Red Team skills - if your job involves network penetration (such as through phishing emails) and subsequently pivoting through Active Directory environments with the occasional Linux server, this is the course for you. If you are mostly working on application penetration testing (think web and mobile apps), OSWE is a better fit. And if you are doing vulnerability research in binaries, OSED will build that foundation.
Overall, I felt that the OSEP was worth the price of admission given the sheer amount of content it throws at you, as well as the excellent labs that will solidify your learning-by-doing. Here’s my review along with some tips and tricks to maximize your OSEP experience.
What You Should Know 🔗
Before jumping in, Offensive Security recommends the following:
- Working familiarity with Kali Linux and Linux command line
- Solid ability in enumerating targets to identify vulnerabilities
- Basic scripting abilities in Bash, Python, and PowerShell
- Identifying and exploiting vulnerabilities like SQL injection, file inclusion, and local privilege escalation
- Foundational understanding of Active Directory and knowledge of basic AD attacks
- Familiarity with C# programming is a plus
Given that PEN-300 is an advanced course, I definitely recommend getting the OSCP first if you don’t have the fundamental skills OSEP requires. Additionally, even though the course says familiarity with C# programming is a plus, I think it’s almost a necessity given how much C# features in the course.
What You Will Learn 🔗
When it comes to Offensive Security courses, I’ve come to expect a main dish of core knowledge along with a grab-bag of funky side dishes. While PEN-300 dives deep into core penetration testing skills such as antivirus evasion and Active Directory enumeration, it also includes a bunch of extras such as kiosk hacking (think airport internet terminals or digital mall directories), DNS exfiltration, and more. You never know when you might need this knowledge, but I felt that this sometimes comes at the cost of depth. In particular, I felt that the Linux sections were noticeably sparser than the Windows ones; looking at bash histories or Vim configurations isn’t exactly groundbreaking.
On the other hand, OSEP is extremely good when it goes deep. I started the course with only a passing knowledge of Active Directory and Windows payloads, but came out confident that I could craft a Word macro or C# executable payload that could evade most antivirus engines and subsequently pivot through the network. In particular, OSEP teaches you about the Windows system APIs that many tools use behind the scenes. So rather than using Mimikatz to dump a credential database, you’ll be taught how Mimikatz does this and code it yourself.
As such, you’ll be spending a lot of time in Visual Studio coding up your payloads from scratch. I found this experience invaluable in pushing my knowledge beyond OSCP-level practitioner skills into a deep understanding of the Windows environment. The exploits and techniques remain relevant to modern contexts; you’ll be working on Windows 10 and Windows Server 2019 boxes most of the time, as well as the latest versions of Linux. The boxes also regularly update their antivirus signatures.
I also really liked how each chapter builds on the previous one. Offensive Security continuously throws additional roadblocks at your initial payload, forcing you to rebuild over and over again. Got an in-memory Meterpreter shell working? Try evading this antivirus! Managed to bypass that? How about beating AppLocker? Got your shell and trying to run some enumeration scripts? Sorry buddy, you have to deal with AMSI. At the end of it all, you’ll walk away with a battle-hardened payload and the skills to build it.
What You Should Also Learn By Yourself 🔗
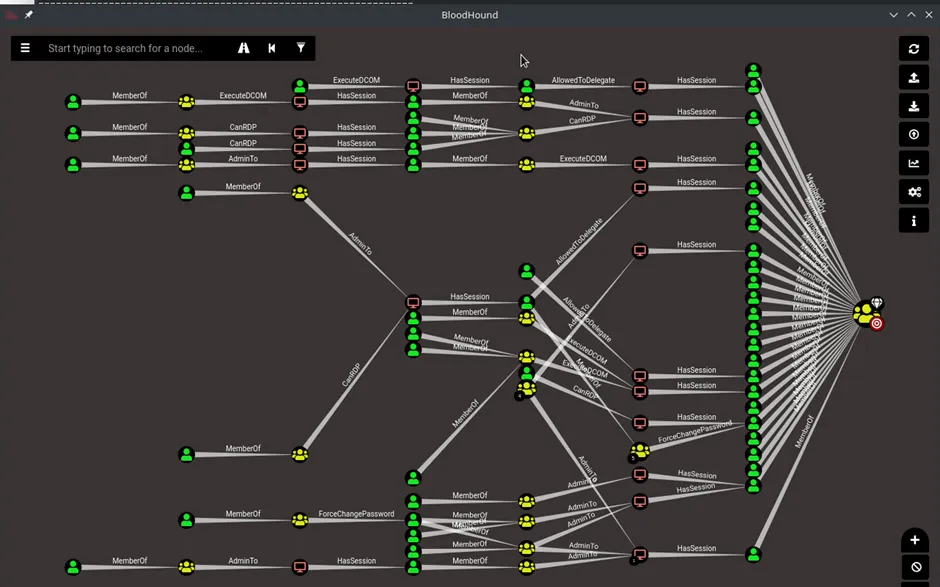
Although PEN-300 is fairly modern, it still misses out on some of the latest developments. Additionally, it only mentions tools like BloodHound in passing but doesn’t teach you how to use it, which seems like a big omission. As such, I think you should bolster your PEN-300 knowledge with these:
- BloodHound: Pretty much essential. Learn how to collect BloodHound data with SharpHound, analyze it, and discover lateral movement vectors. PenTest Partners has a great walkthrough and includes the screenshot below.
- CrackMapExec: Get familiar with this tool and integrate it into your workflow; it’ll speed up your lateral movement.
- Better enumeration scripts: Although PEN-300 recommends a few, I found that I got better coverage by running a few different ones; I like JAWS for Windows and linuxprivchecker for Linux.
- Other Active Directory lateral movements: HackTricks has a good list.
Additionally, familiarize yourself with the quirks of your tooling. For example, only certain versions of Mimikatz work on Windows 10 but don’t work on others; keep multiple versions on hand in case you are dealing with a different environment.
How I Prepared for the Exam 🔗
Given that the OSEP was a new course, I erred on the side of over-preparation:
- Completed every single Extra Mile challenge
- Completed all 6 course labs (do them in order from 1 to 6 as they increase in difficulty)
- Completed several HackTheBox Windows boxes (see below)
- Worked on the HackTheBox Cybernetics Pro Lab
I found that HTB boxes were not as useful as I expected, given that they were limited to one machine as compared to PEN-300’s focus on networks. Here are the boxes I attempted in order of usefulness (most useful first):
- Forest
- Active
- Monteverde
- Cascade
- Resolute
- Mantis
- Fuse
- Fulcrum
While they were great for practicing various tools like CrackMapExec, some were a bit too CTF-like, especially towards the end of the list. I found the HackTheBox Pro Lab far more useful; Cybernetics consists of about 28 boxes across several networks and applies a lot of the techniques taught in PEN-300. If you have the cash to spare (it’s pretty expensive at 90 pounds for a month + initial set up), I’d say go for it, but it’s not necessary.
Additionally, I did some payload preparation before the exam. Make sure to collect all the payloads you have written throughout the course and have them ready to deploy. Write down the scripts, commands, and tools you were taught throughout the course and know how to use them. Since PEN-300 provides the compiled binaries of the tools throughout the labs, I recommend saving them all in one place so that you have a canonical version of Mimikatz or Rubeus that you know will work in the exam environment.
You should also prepare a Windows development virtual machine that uses a shared drive from your Kali machine to easily build and test payloads. Even though the labs and exam provide a development machine, it’s a little slow over the VPN. Microsoft provides a free Windows development VM that’s perfect for the job.
The exam itself is 48 hours (actually 47 hours 45 minutes) and provides several pathways to pass. As per the exam documentation, you can either compromise the final target machine or compromise enough machines to accumulate 100 points.
I took about half a day to pivot through the network and successfully compromise the final machine. Although it was enough to pass, I spent the next one and a half days attempting other machines for practice and writing my report. In general, I think that the course material itself covers what you need for the exam, There’s no need to pay for HackTheBox machines - just do your extra miles and complete all the included labs. Overall, the exam is challenging but not impossible, especially with the multiple ways to pass it. Focus on what you’ve learned, refine your payloads in advance, and you will be able to do it.
After sending in my report on Monday, I received my pass confirmation email on Friday!
Another One Bytes the Dust 🔗
With the OSEP down, I’ll be taking on EXP-301/OSED to build my vulnerability research skills. Since most cybersecurity professionals these days have to work in interdisciplinary fields rather than in silos, the Offensive Security Certified Expert – Three bundle makes a lot of sense. At the same time, I think the OSEP stands tall on its own as an advanced Red Team penetration testing course. Whether you’re looking to take the next step beyond OSCP into Red Teaming or rounding out your offensive security skills, there’s something for you.