Motivation 🔗
The Peach protocol fuzzer was a well-known protocol fuzzer whose parent company – Peach Tech – was acquired by GitLab in 2020. While Peach Tech had previously released a Community Edition of Peach fuzzer, it lacked many key features and updates found in the commercial editions. Fortunately, GitLab has open-sourced the core protocol fuzzing engine of Peach under the name “GitLab Protocol Fuzzer Community Edition,” allowing anyone to build and deploy it. For simplicity, I will refer to the new open-sourced version as Peach Fuzzer.

As expected of an early-stage project, the build process is complicated and not well-documented. In addition, first-time users may have trouble understanding how to use the fuzzer. Moreover, GitLab’s open-sourced version still lacks important resources such as fuzzing templates, which means you will have to write them on your own.
To that end, this article aims to demonstrate an end-to-end application of Peach Fuzzer, from build to deployment. Look out for a subsequent article where I will touch on the full workflow of finding and exploiting vulnerabilities using Peach Fuzzer.
Building Peach Fuzzer 🔗
Although Peach Fuzzer can be built on both Linux and Windows, it appeared that the Linux build flow was broken at the time of writing. As such, I built the application in Windows , for Windows.
I used the latest version of Windows 10 Professional even though Microsoft does provide handy virtual machines for free. Due to the onerous dependency requirements, I highly recommend building Peach Fuzzer in a fresh virtual machine to avoid messing up your own regular setup.
Dependencies 🔗
The existing documentation on the GitLab repository lists the following build prerequisites:
-
Python 2.7
-
Ruby 2.3
-
doxygen, java, xmllint, xsltprocx
-
.NET Framework 4.6.1
-
Visual Studio 2015 or 2017 with C++ compilers
-
TypeScript Compiler (tsc) v2.8
-
Intel Pin
Let us go through them one by one.
Python 2.7 🔗
Yep, it is already deprecated, but the build flow is explicitly written for 2.7 and is not compatible with Python 3 (I tried). Get the x86-64 MSI installer at https://www.python.org/downloads/release/python-2718/ and install it – remember to select the installation option to add it to your PATH! Alternatively, if you already have Python 3 installed, you can continue to install 2.7, and then run Python with py -2.7 <PYTHON COMMANDS>.
Ruby 2.3 🔗
While the documentation recommends an outdated version of Ruby, I was fine installing Ruby 2.7.2-1 (x64) from the RubyInstaller download page (without DevKit). Remember to select the option to add this to your PATH. Although you do not need the MSYS2 toolchain, it would not hurt to have it installed.
java, xmllint, xsltprocx 🔗
This is a long list and it would be probably tedious to install these dependencies separately. Thankfully, these packages are mostly available via the Chocolatey Windows package manager. Start by installing Chocolatey with the instructions found at https://chocolatey.org/install, then run the following commands in an elevated PowerShell window:
choco install jdk8
choco install xsltproc
choco install git
You need to install git as well to clone the Peach Fuzzer repository later.
doxygen 🔗
doxygen is a special case – you will need to install it from the installer at https://www.doxygen.nl/download.html. After that, edit the PATH environment variable to include C:\Program Files\doxygen\bin.
.NET Framework 4.6.1, Visual Studio 2015 or 2017 with C++ compilers 🔗
Here is where things get a bit complicated. Even though the documentation states .NET Framework 4.6.1, it appears that 4.5.1 is necessary as well to prevent the build process from crashing. Since the latest version of Visual Studio is 2019, you cannot download Visual Studio 2017 directly. Go to this download page to get the older versions and create a free Visual Studio Dev Essentials account to access it. Download Visual Studio Community 2017 (version 15.9) and start the installation.
You will be prompted to install the different developer components. I selected the Desktop development with C++ workload. In addition, I chose the .NET Framework 4.6.1 and 4.5.1 SDKs with targeting packs under “Individual components”. You can see a list of my installation components in the right sidebar for your reference.

Visual Studio Component Installation Screen
TypeScript Compiler 🔗
Although tsc appears to be installed by default in Node (by running npx tsc), you will also have to install this globally. Install the LTS version of Node at https://nodejs.org/en/, then run npm install typescript --global in an elevated command prompt and you are all set!
Intel Pin 🔗
This is another tricky one. The documentation recommends v3.2 81205 but it is so outdated that the Intel page no longer lists it. You can download them directly from one of these links:
-
Windows: http://software.intel.com/sites/landingpage/pintool/downloads/pin-3.4-97438-msvc-windows.zip
-
Linux: http://software.intel.com/sites/landingpage/pintool/downloads/pin-3.2-81205-gcc-linux.tar.gz
-
MacOS: http://software.intel.com/sites/landingpage/pintool/downloads/pin-3.2-81205-clang-mac.tar.gz
Since you are building for Windows, you only need the Windows version. Open the zip file and copy the pin-3.2-81205-msvc-windows folder to protocol-fuzzer-ce\3rdParty\pin.
Hidden Dependencies 🔗
There are a few more dependencies for Peach to work, but they are not listed in the documentation:
-
.NET Framework 4.5.1
-
WinDBG
-
WireShark
-
Visual C++ Redistributable for Visual Studio 2012 Update 4
.NET Framework 4.5.1 can be installed with Visual Studio as described above. To install WinDBG, follow the instructions at https://docs.microsoft.com/en-us/windows-hardware/drivers/debugger/debugger-download-tools. WireShark has a standard installer which you can use without any issues. This will allow you to use the Windows Debugger and packet monitors.
Since Peach Fuzzer uses !exploitable to triage crashes, you will need to install the specific version Visual C++ Redistributable for Visual Studio 2012 Update 4 from https://www.microsoft.com/en-us/download/details.aspx?id=30679. I tested other versions and it only works with the 2012 version.
Build Commands 🔗
Finally, it is time to build! Clone the repository and cd into it and run python waf configure (or py -2.7 waf configure in my case). If all goes well, you should see this:
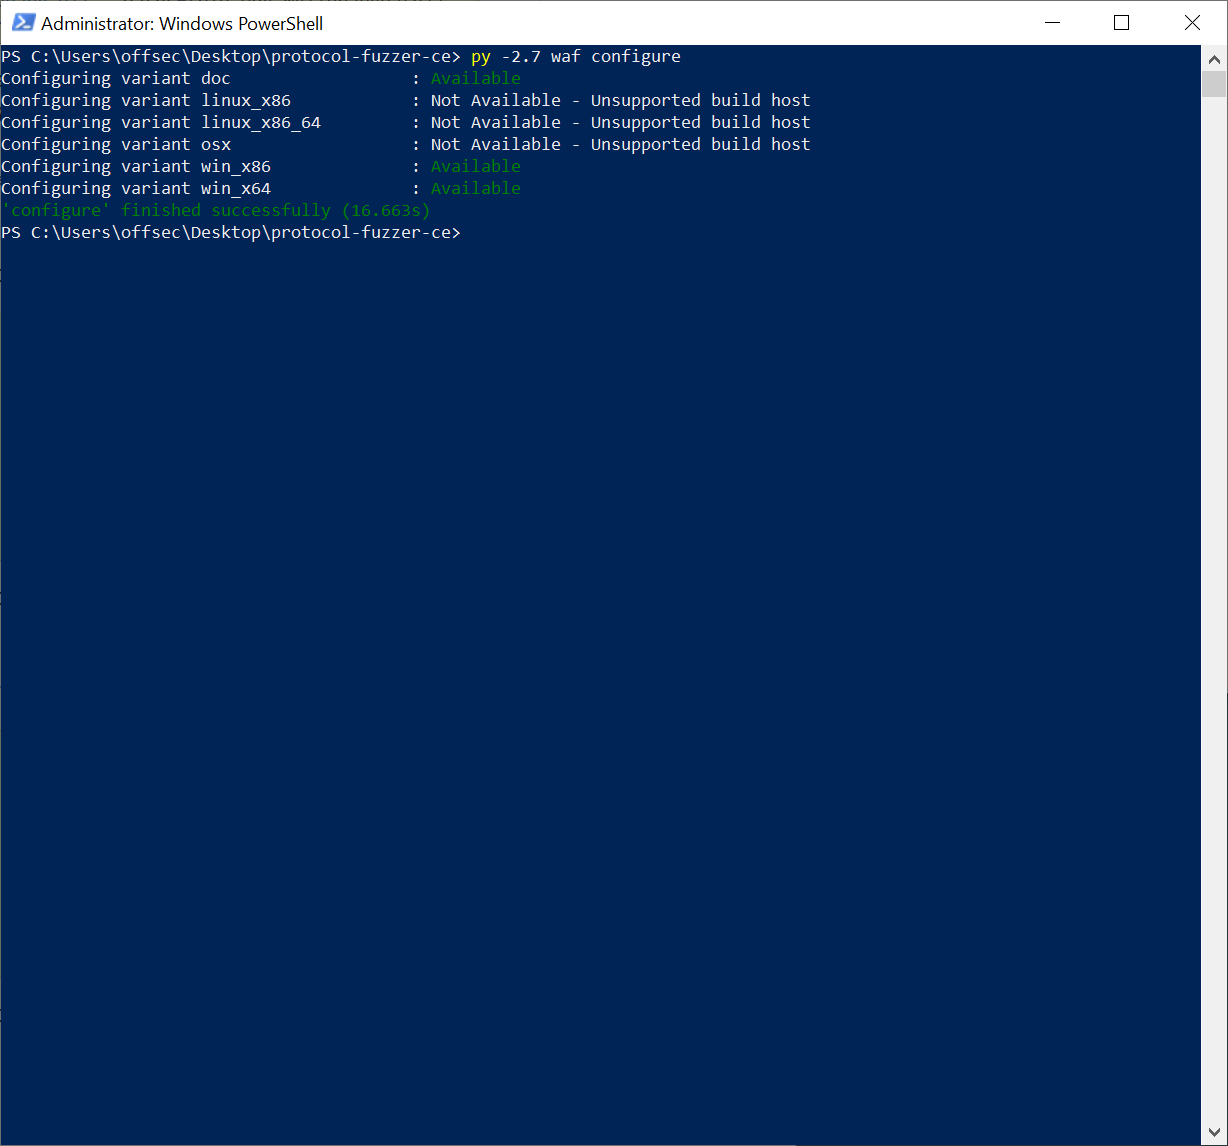
WAF Configure
If the build fails, it is time to start debugging. I found the error messages from configure helpful as most of the time, the failure is caused by a missing dependency. You can also use the Visual Studio installer to repair your installation in case binaries were removed.
After configuration, run python waf build. This will build your documentation as well as the Windows x86 and x64 variants in protocol-fuzzer-ce\slag. Finally, run python waf install to create the final binaries and output to protocol-fuzzer-ce\output.
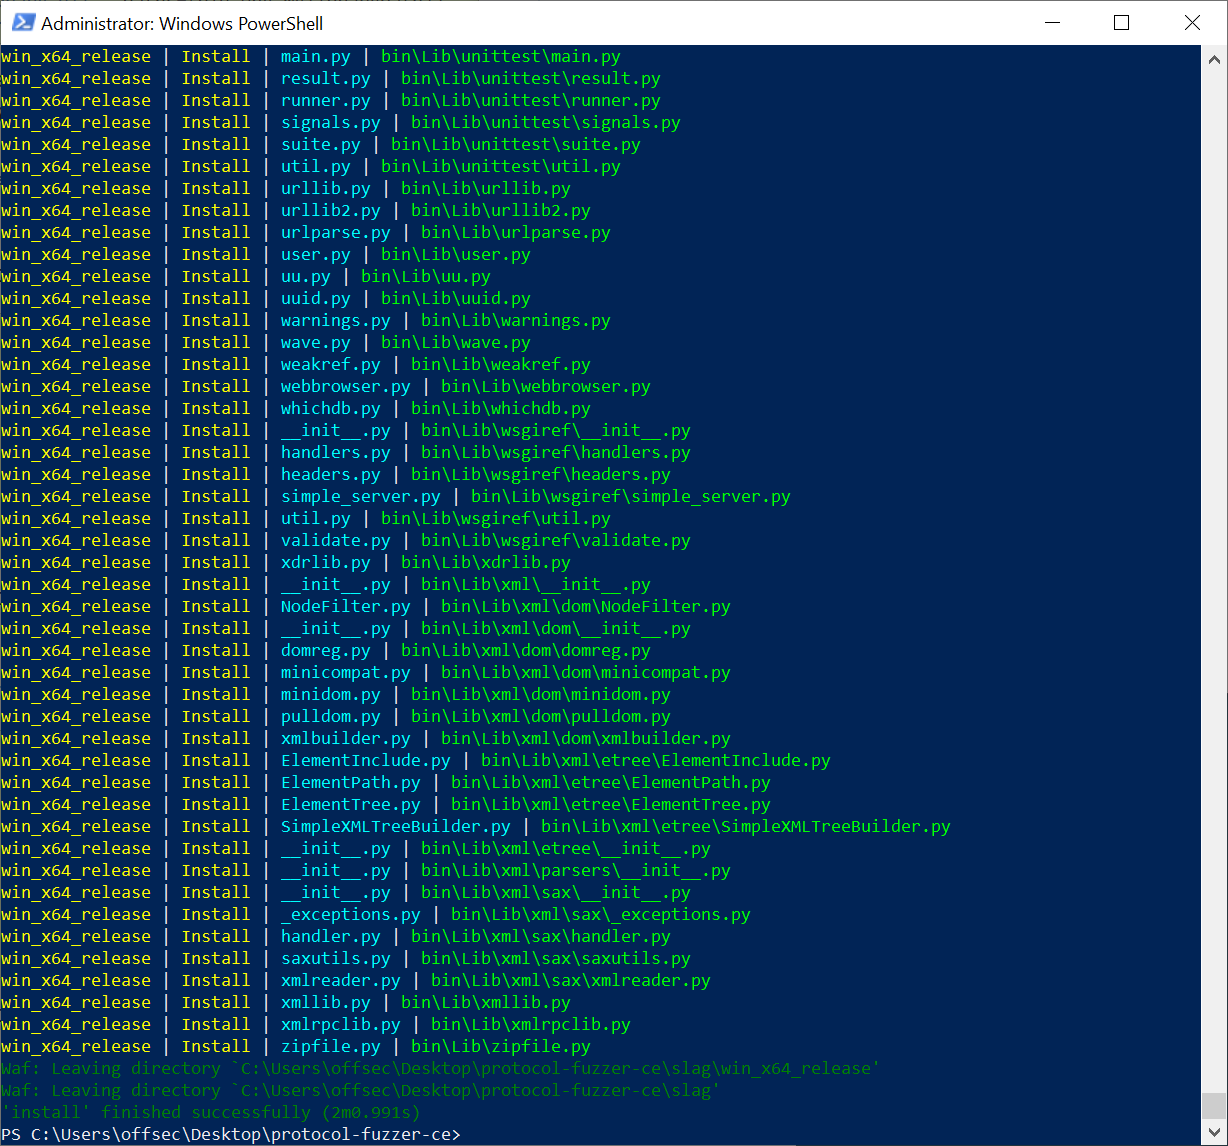
WAF Install
As we did not specify the variant for installation, the installer will generate files for both debug and release for x86 and x64. For most purposes, you will want to use the release version of x64; this will be your Peach directory.
Running Peach Fuzzer 🔗
Writing Templates 🔗
After building Peach Fuzzer, it is time to put it through its paces. Peach Fuzzer is a generational fuzzer – this means it generates test cases from user-defined templates. This is especially useful for highly structured file types or protocols with strict checksums and formatting.
I will demonstrate Peach Fuzzer’s capabilities by running my template against a small test case: a remote buffer overflow via a HTTP request to Savant Web Server 3.1. It is always good to validate your templates against a known vulnerable application. Although the open-source version of Peach Fuzzer does not come with any built-in templates, there are pretty good templates (known as Pits in Peach) available such as this HTTP Pit.
Before writing your templates, I highly recommend reading the “Peach Pro Developer Guide” that is generated in output\doc\sdk\docs as part of the build process. It provides details about the individual components of the templates, as well as the arguments and inputs for the various Peach binaries which I will not be discussing in this article. Now back to testing the template:
I adapted the previous HTTP Pit file into a generic GET HTTP template:
 <?xml version="1.0" encoding="utf-8"?>
    <Peach xmlns="http://peachfuzzer.com/2012/Peach" xmlns:xsi="http://www.w3.org/2001/XMLSchema-instance"
        xsi:schemaLocation="http://peachfuzzer.com/2012/Peach ../peach.xsd">

        <DataModel name="GetRequest">
            <String value="GET " mutable="false" token="true"/>
            <String value="/"/>
            <String value=" HTTP/1.1" mutable="false" token="true"/>
            <String value="\r\n" mutable="false" token="true"/>

            <String value="User-Agent: " mutable="false" token="true"/>
            <String value="Mozilla/5.0"/>
            <String value="\r\n" mutable="false" token="true"/>

            <String value="Host: ##HOST##:##PORT##" mutable="false" token="true"/>
            <String value="\r\n" mutable="false" token="true"/>

            <String value="Accept: " mutable="false" token="true"/>
            <String value="text/html,application/xhtml+xml,application/xml;q=0.9,*/*;q=0.8"/>
            <String value="\r\n" mutable="false" token="true"/>

            <String value="Accept-Language: " mutable="false" token="true"/>
            <String value="en-us"/>
            <String value="\r\n" mutable="false" token="true"/>

            <String value="Accept-Encoding: " mutable="false" token="true"/>
            <String value="gzip, deflate"/>
            <String value="\r\n" mutable="false" token="true"/>

            <String value="Referer: " mutable="false" token="true"/>
            <String value="http://##HOST##/"/>
            <String value="\r\n" mutable="false" token="true"/>

            <String value="Cookie: " mutable="false" token="true"/>
            <String value=""/>

            <String value="Conection: " mutable="false" token="true"/>
            <String value="Keep-Alive" mutable="false" token="true"/>
            <String value="\r\n" mutable="false" token="true"/>
            <String value="\r\n" mutable="false" token="true"/>
        </DataModel>

        <DataModel name="GetResponse">
            <String value="" />
        </DataModel>

        <StateModel name="StateGet" initialState="Initial">
            <State name="Initial">
                <Action type="output">
                    <DataModel ref="GetRequest"/>
                </Action>
                <Action type="input">
                    <DataModel ref="GetResponse"/>
                </Action>
            </State>
        </StateModel>

        <Agent name="LocalAgent">
            <Monitor class="WindowsDebugger" />
        </Agent>

        <Test name="Default">
            <StateModel ref="StateGet"/>
            <Agent ref="LocalAgent"/>
            <Publisher class="TcpClient">
                <Param name="Host" value="##HOST##"/>
                <Param name="Port" value="##PORT##"/>
            </Publisher>

            <Logger class="File">
                <Param name="Path" value="Logs"/>
            </Logger>
            <Strategy class="Sequential" />
        </Test>
    </Peach>
In order to support the parameters, Peach Pits must also be accompanied by a configuration file:
    <?xml version="1.0" encoding="utf-8"?>
    <PitDefines>
        <All>
            <String key="HOST" value="127.0.0.1" name="Host" description="Server host name or IP"/>
            <String key="PORT" value="21" name="Port" description="Server port number"/>
        </All>
    </PitDefines>
Thereafter, copy the http_get.xml and http_get.xml.config into {PEACH DIRECTORY}\bin\pits\Net\http_get.xml. You can rename the folder from Net to any other category. Note: Your templates MUST be in a subfolder of pits, otherwise it will not turn up in the Peach GUI.
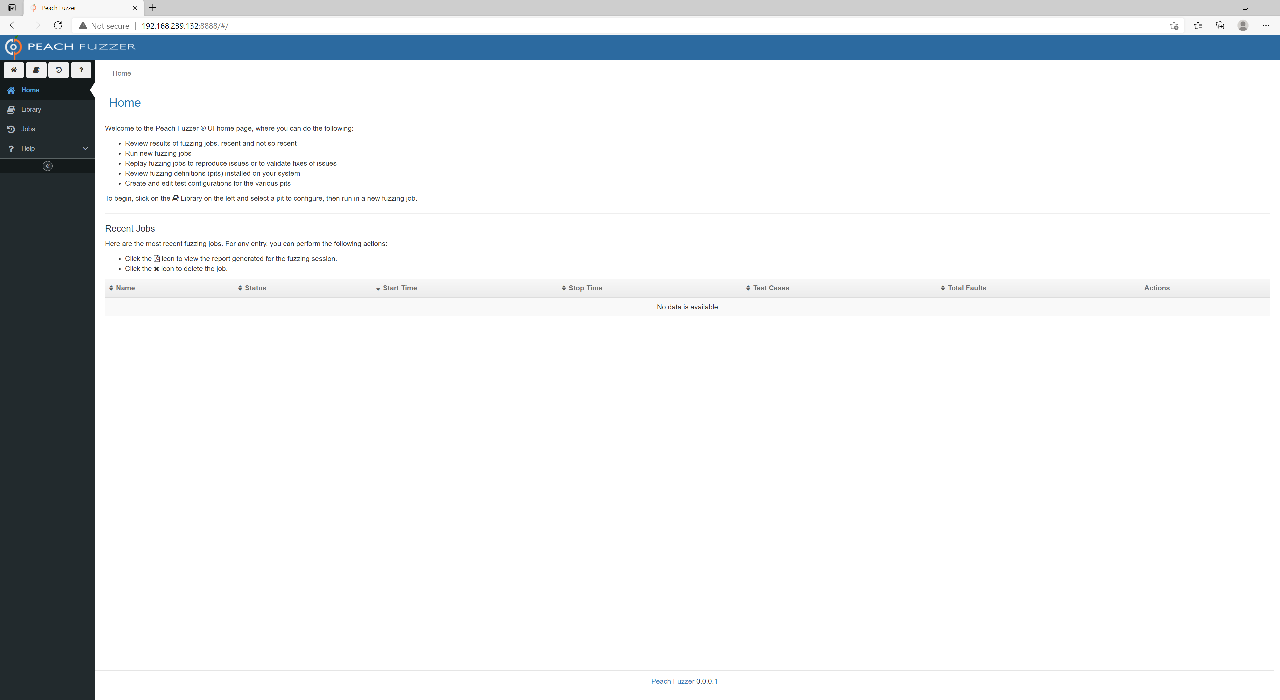
Next, from the Peach directory, run .\Peach.exe. This will start up the web interface on port 8888 and open it up in your browser. Lucky you!
Peach Web Interface
Configuring a Fuzzing Session 🔗
We are nearly there! Continue by installing the vulnerable version of Savant from the Exploit Database page.
Next, go to Library where you should see your HTTP Get template listed. Click it to start a new Pit configuration. Since we are fuzzing Savant’s Web Server, name the configuration Savant.
In the next screen, select Variables. From here, overwrite the parameters to match the host and port that Savant will occupy.
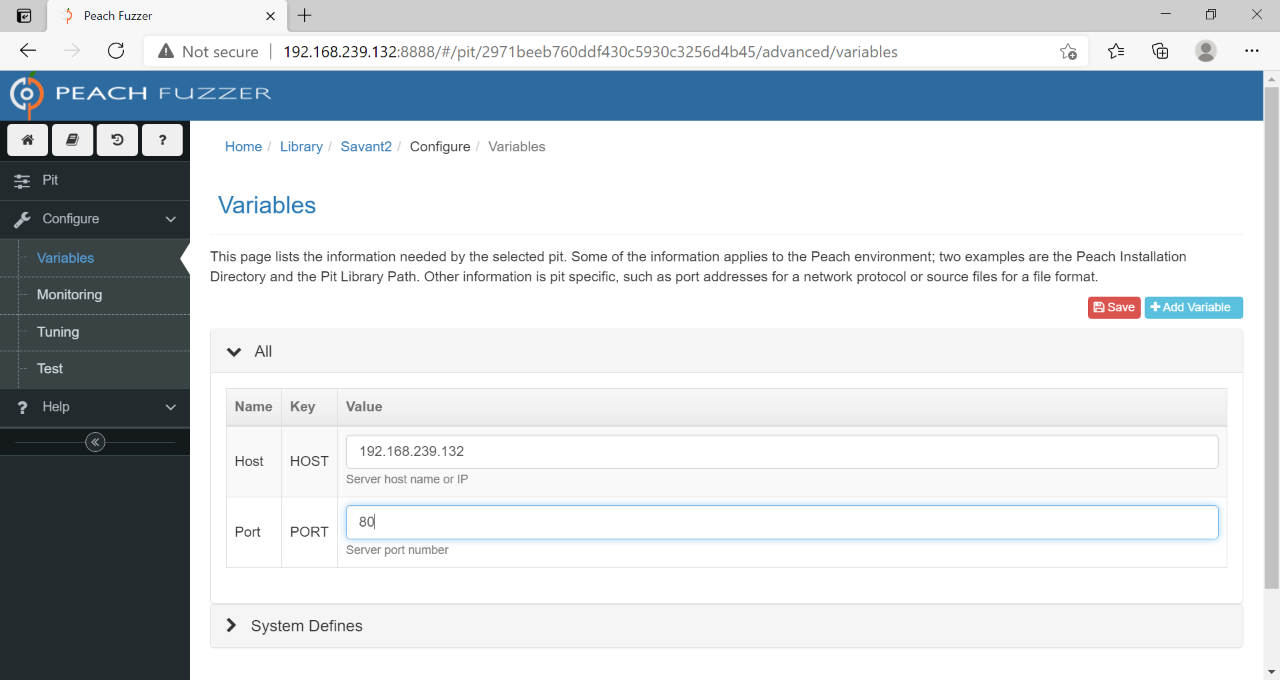
Configure Variables
Next, you will need to add Monitors. If you are running Peach directly from the CLI, these would already be defined in your template. However, the web interface appears to require manual configuration. Let us look at the two steps to do so:
Step One: add an agent. This defaults to local, meaning the agent will run in the Peach instance itself rather than in a different host. Name it something reasonable, like LocalAgent.
Step two: add a monitor. Since we want to monitor the Savant process for crashes, we must add a Windows Debugger monitor and set the Executable parameter to the path Savant.exe.
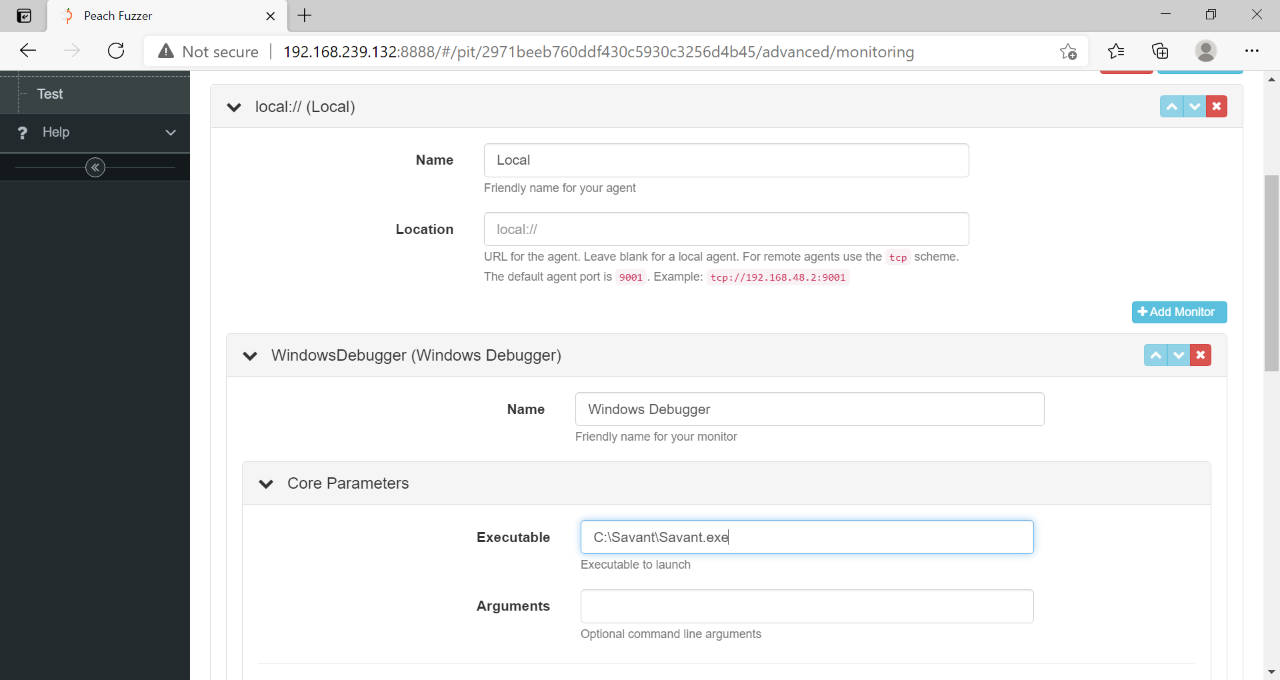
Configure Monitors
Peach Fuzzer also comes with lots of useful monitors and automations such as a popup clicker (e.g. closing registration reminders) and network monitoring. For now, the Windows Debugger is all you need.
Save your monitoring configuration, then go to Test to perform a test run. This will run Savant with one test case to ensure everything goes smoothly. If all goes well, it is time to run your fuzzing session!
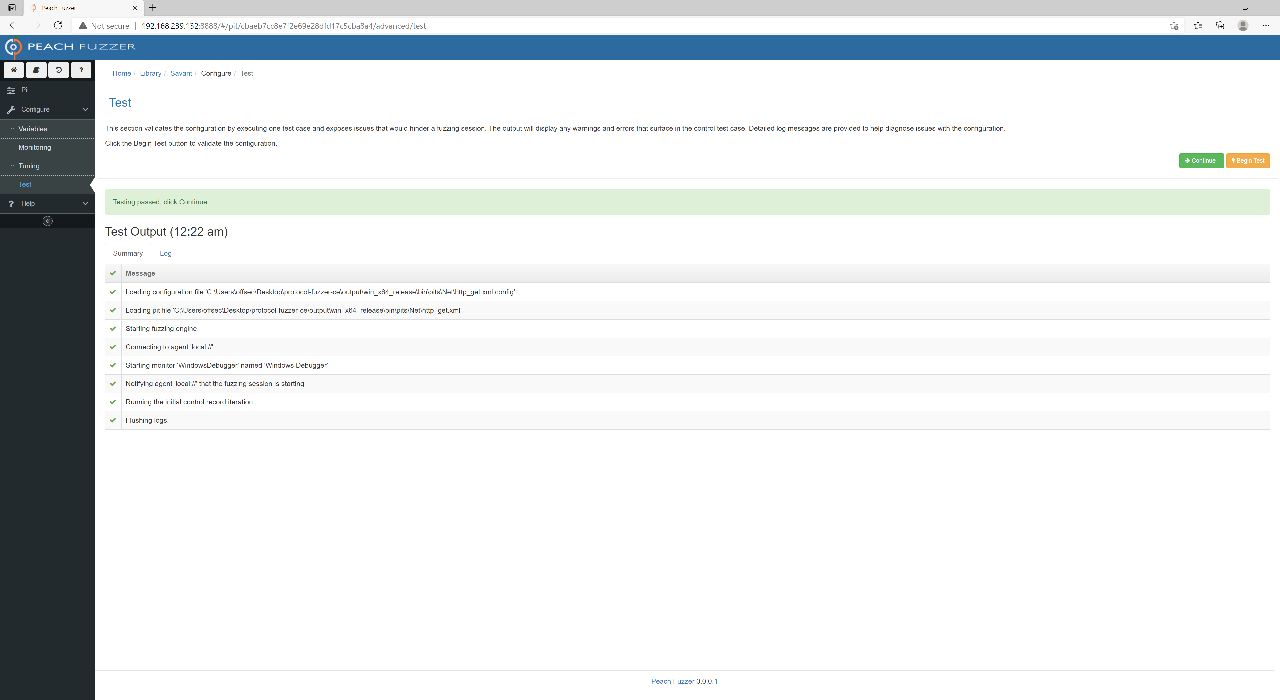
Successful Test
Running a Fuzzing Session 🔗
Go back to the main dashboard to start your session. Cross your fingers! In Savant’s case, it will only be a few seconds before you hit your first fault (crash)!
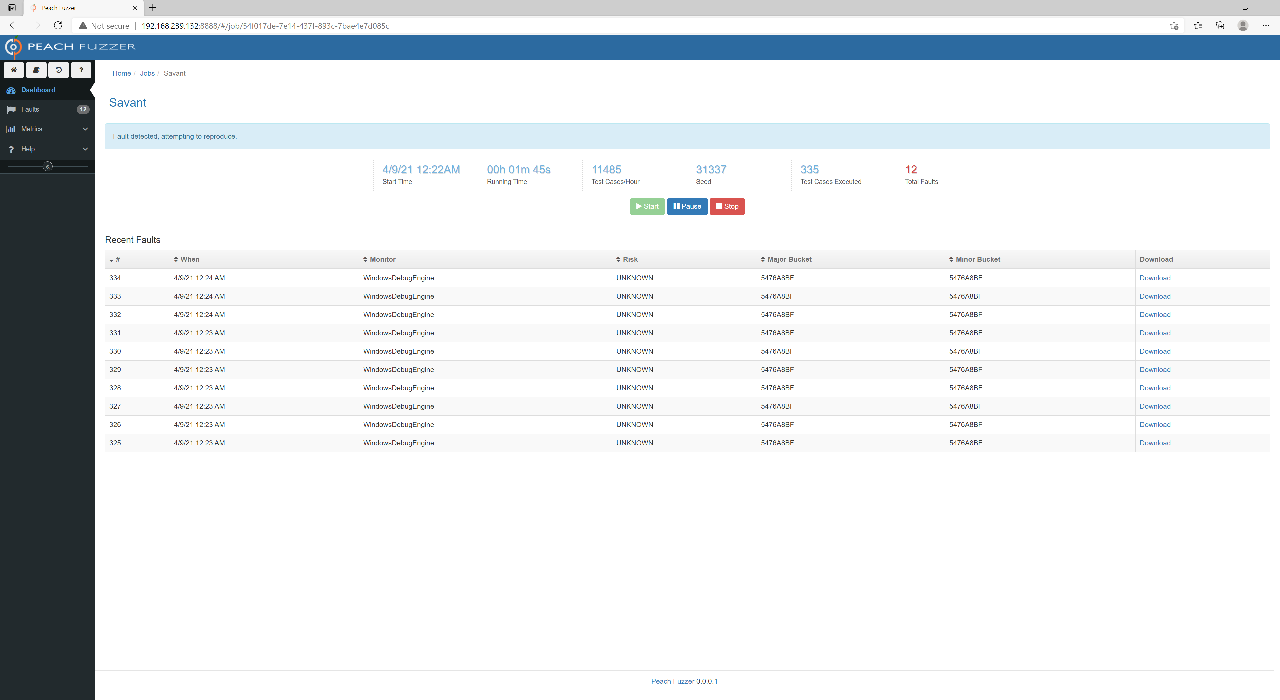
Fuzzing Session
Peach Fuzzer will automatically triage your crashes with the WinDbg’s !exploitable in the Risk column (in the screenshot everything is UNKNOWN due to the missing 2012 Redistributable dependency, but it should be properly triaged if it is installed).
You can click on individual test cases to view the proper description and memory of the crash.
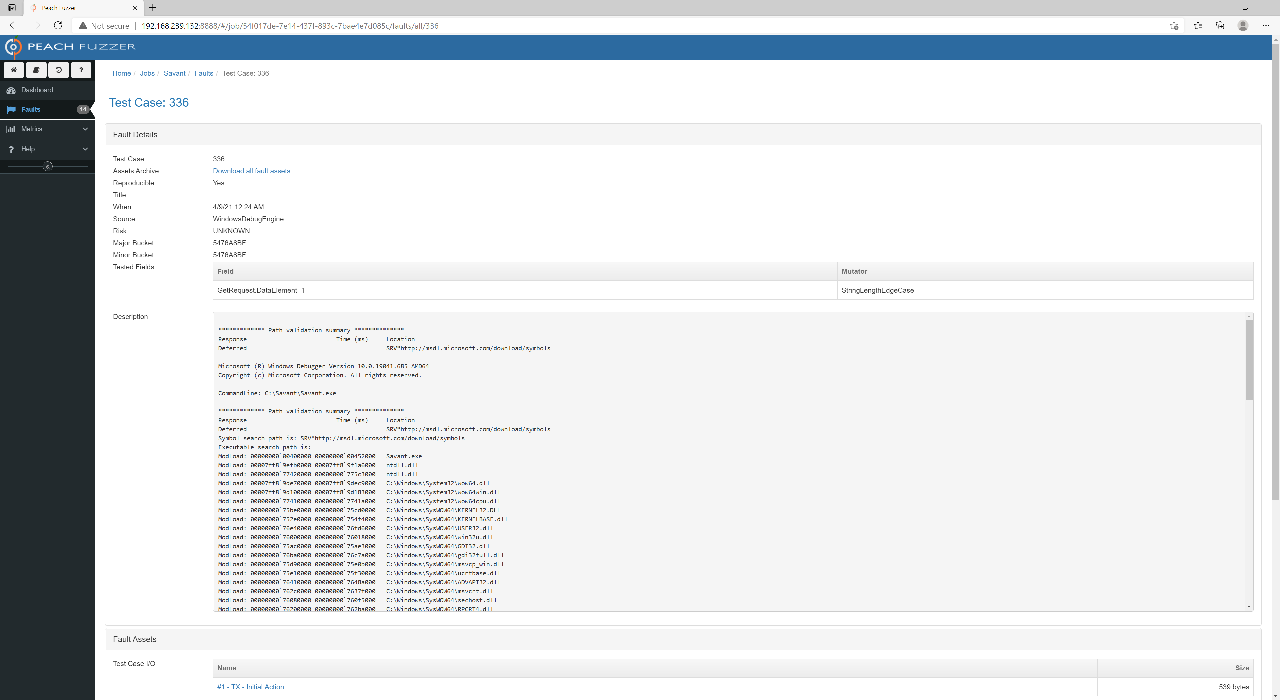
Fault Detail
You can also download the test case that caused the crash. If we inspect the test case for Savant, we will see that Peach Fuzzer modified the GET / path to GET ///////////... The WinDBG output also suggests that EIP has been overwritten. With that, we have proven that the template can successfully discover the known request header buffer overflow vulnerability in Savant by fuzzing it. Now go forth and find another target!
Conclusion 🔗
In terms of free and open-source template-based generational fuzzers, researchers do not have many options. The biggest alternative is the Python “Monsters Inc.” line of fuzzers, namely Sulley, later BooFuzz, and now Fuzzowski by NCC Group. GitLab’s open-source Peach Fuzzer presents a big step forward in terms of usability and sophistication, albeit limited by the lack of prebuilt templates. If you have templates from a previous purchase of Peach Fuzzer Professional, you are in luck. However, the secret sauce of these fuzzers is always the templates. Sadly, GitLab will not be open-sourcing the Pro templates and will only be offering them behind a commercial product later this year. Without a large library of templates, the usefulness of Peach Fuzzer is limited.
If you are willing to put in the work to build your own templates, I think that Peach Fuzzer is a fantastic starter kit to get you into the fuzzing game. However when it comes to more advanced fuzzing, Peach falls short. While it claims to be a “smart” fuzzer, it was documented in an older era of fuzzing. It is perhaps more accurate to call it a generational or file format-aware fuzzer that fuzzes based on prewritten templates. These days, coverage-guided/feedback-driven fuzzers such as AFL and Honggfuzz may be considered more advanced approaches. Peach only uses Intel Pin to minimise corpora and does not appear to use it for actual fuzzing.
Peach, however, still has its place in any researcher’s toolkit, especially if your focus is on specific file structures. I found that Peach is especially useful for prototyping potential fuzzing targets due to the quick setup and ability to fuzz black-box targets without a harness. It can still pick up surface-level vulnerabilities and help highlight potentially vulnerable targets for deeper fuzzing.