Updated April 19, 2020:
- Install OpenSSH through Cydia (ramsexy)
- Checkra1n now supports Linux (inhibitor181)
- Use a USB Type-A cable instead of Type-C (c0rv4x)
Updated April 26, 2020:
- Linux-specific instructions (inhibitor181)
Updated August 14, 2020:
- Burp TLS v1.3 configuration
Motivation 🔗
I wanted to get into mobile app pentesting. While it’s relatively easy to get started on Android, it’s harder to do so with iOS. For example, while Android has Android Virtual Device and a host of other third-party emulators, iOS only has a Xcode’s iOS Simulator, which mimics the software environment of an iPhone and not the hardware. As such, iOS app pentesting requires an actual OS device.
Moreover, it’s a major hassle to do even basic things like bypassing SSL certificate pinning. Portswigger’s Burp Suite Mobile Assistant needs to be installed onto a jailbroken device and only works on iOS 9 and below.
For the longest time, iOS pentesting guides recommended buying an old iPhone with deprecated iOS versions off eBay. More recent efforts like Yogendra Jaiswal’s excellent guide are based on the Unc0ver jailbreak, which works on iOS 11.0-12.4. If you don’t have an iDevice in that range, you’re out of luck.
Fortunately, with the release off the checkra1n jailbreak, A5-A11 iPhone, iPad and iPods on the latest iOS can now be jailbroken. Many iOS app pentesting tools, having lain dormant during the long winter of jailbreaking, are now catching up and new tools are also being released.
As such, I’m writing quickstart guide for iOS app pentesting on modern devices with the checkra1n jailbreak and consolidating different tools’ setup guides in one place. I will follow up with a post on bugs I’ve found on iOS apps using the tools installed here.
Quickstart 🔗
Hardware 🔗
Let’s start with the basics. You need an A5-A11 iDevice, preferably an iPhone. I used an iPhone 8. Thanks to checkra1n, you don’t really have to worry about the iOS version; as of now, it supports the latest iOS 13.3. Other than macOS, checkra1n also supports Linux.
Jailbreak 🔗
Warning: Jailbreaking your iDevice significantly weakens your security posture. You should not be doing this on your primary device. In fact, you should not use the jailbroken device for anything other than pentesting.
Please jailbreak your device with a USB-A cable as USB-C jailbreaks have caused issues.
Take note that checkra1n is a semi-tethered jailbreak; every time you restart the iPhone, the jailbreak is lost, so you have to do this again.
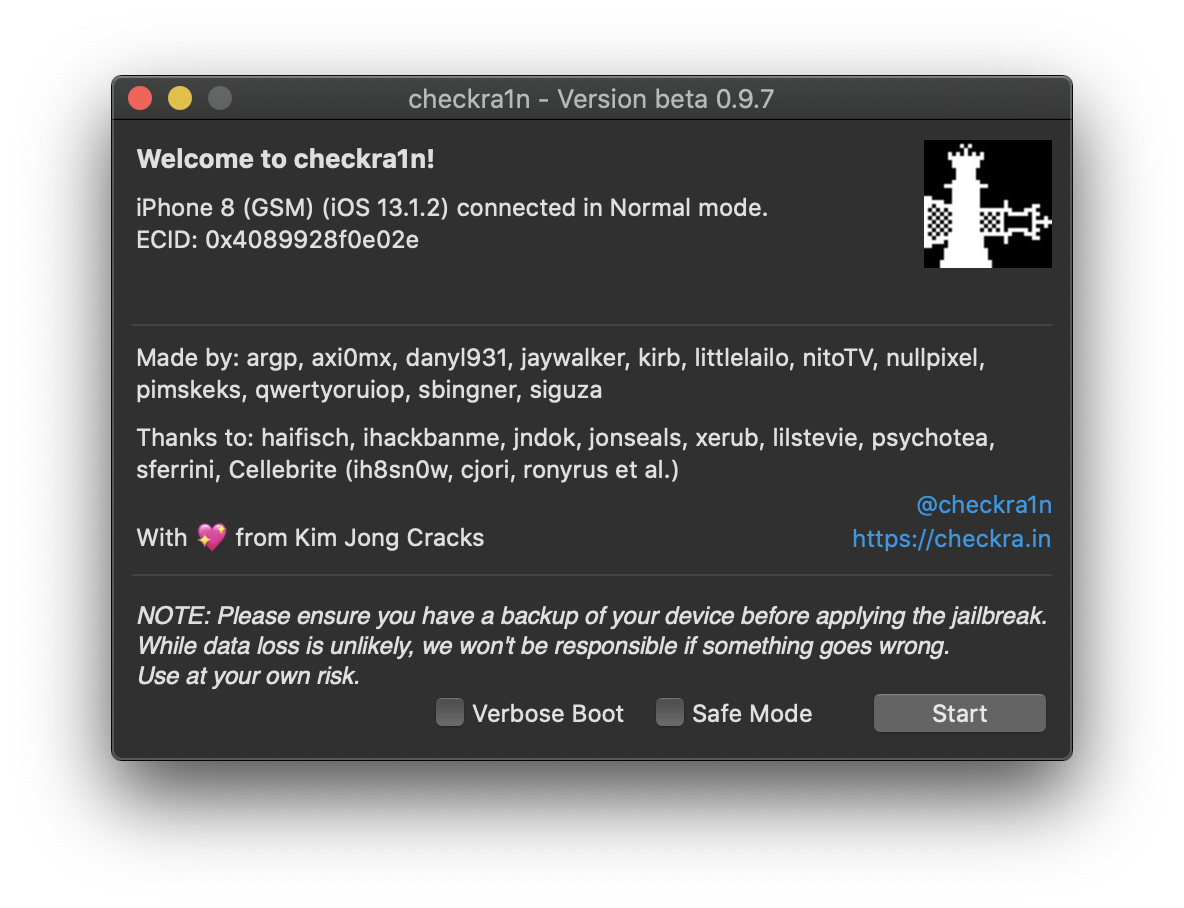
- Download the latest checkra1n jailbreak at https://checkra.in/
- Connect your iPhone to your macOS device and open checkra1n with Applications → Right click checkra1n → Open.
- Unlock your iPhone and click “Start” in checkra1n
- Follow the rest of the steps in checkra1n and restart as necessary
For Linux, follow the instructions here to install checkra1n before proceeding to open it and run the same steps to jailbreak your iPhone.
Congrats! You have a jailbroken iPhone. Let’s get down to business.
Cydia 🔗
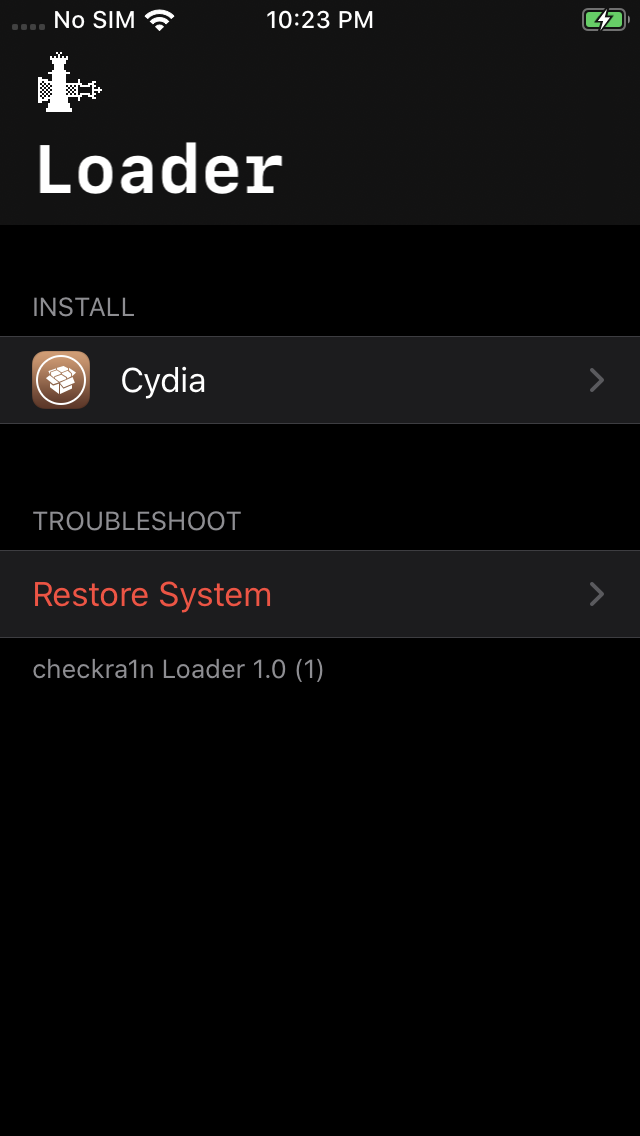
This is super simple. On the jailbroken iPhone, open up the checkra1n app, then click “Cydia” in the “Install” section.
Now you have Cydia and can install several packages that will help in your testing. More on that later.
iProxy 🔗
While you can SSH into your iPhone over the wireless network, it’s a lot faster and more reliable to do that over USB.
On your iPhone, go to the Cydia store and install the OpenSSH package. After installing, it should restart Springboard.
Back on your connected macOS devices, run:
brew install libusbmuxd(apt-get install libusbmuxd*for Linux)iproxy 2222 22(iproxy 2222 44for Linux)- In another terminal, run
ssh root@localhost -p 2222 - For the password, enter
alpine - You should now have an SSH session in your iPhone
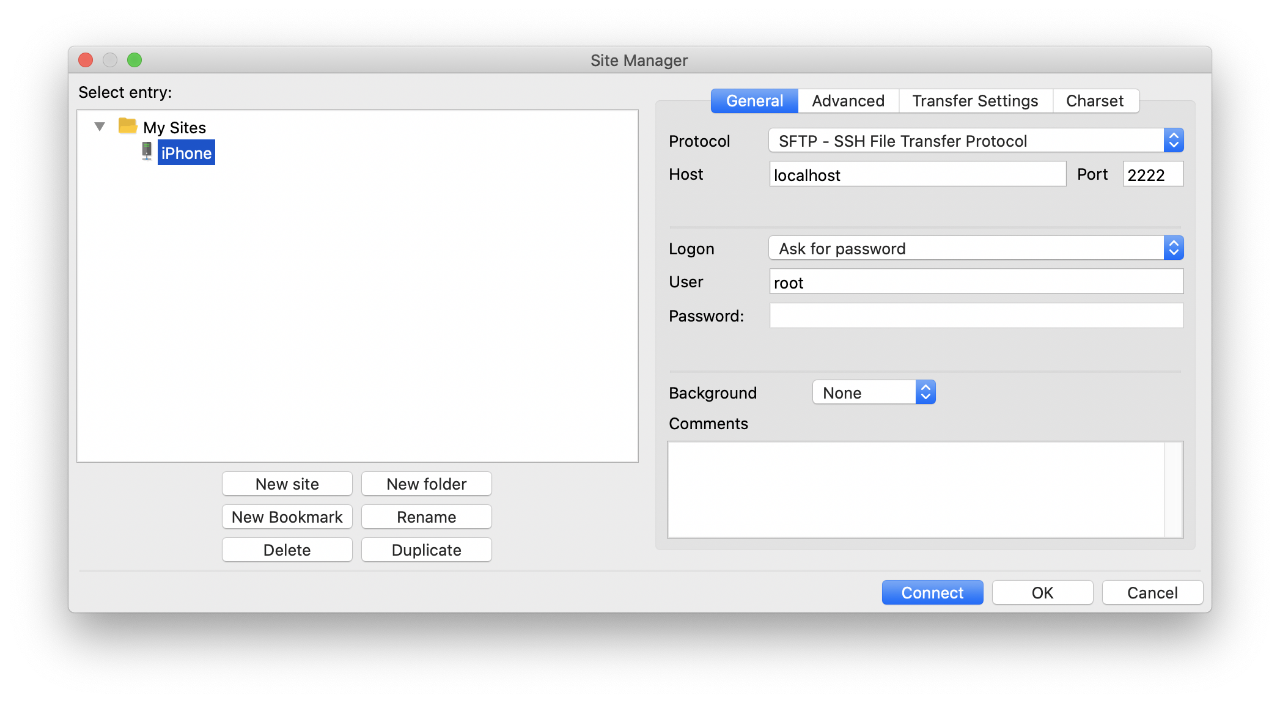
One perk is that you can also transfer files to and from your iPhone over SFTP using a client like FileZilla. Just select the SFTP protocol, set your host to localhost and port to 2222.
Frida and Objection 🔗
It’s time to install my two favorite mobile app testing tools, Frida and Objection. I won’t go through in detail about their usage here, just the set up. Frida has an iOS guide I will refer to.
- On your macOS device, run
pip3 install frida-tools - On your iPhone, open Cydia and add Frida’s repository by going to Sources → Edit → Add and enter
https://build.frida.re - Go to Search → Enter
Frida→ Install - Back on your macOS device, run
pip3 install objection - Finally, run
objection --gadget "com.apple.AppStore" exploreto check that everything is integrated properly
Proxy Traffic and Bypass Cert Pinning 🔗
Proxying traffic through Burp Suite is fairly standard; follow the steps outlined in Yogendra Jaiswal’s post. Recently, Burp Suite added the option to disable TLSv1.3 in version 2020.4, which helps iOS trust your custom certificates.
- On Burp Suite, go to Proxy → Options → Proxy Listener → Add → Bind to port: 1337 → Bind to address : All interfaces (or select a Specific Address) → TLS Protocols → Use Custom Protocols → Uncheck TLSv1.3 → “OK”
- On your iPhone, Settings → Wi-Fi → Info → Configure Proxy → Manual → Set server and port to the ones from the previous step
- On your iPhone, go to
http://burp→ Click “CA Certificate” → Download profile → Settings → General → Profiles & Device Management → Portswigger CA → Install
Now traffic should be proxied through Burp - except for apps that utilize certificate pinning. Fortunately, the SSL Kill Switch 2 certificate pinning bypass tool was recently updated to support iOS 13.
- Make sure you have the following packages installed in Cydia:
wget,Debian Packager,Cydia Substrate,PreferenceLoader - Go to the SSL Kill Switch 2 release page and copy the link to the latest
.debrelease - SSH into your iPhone (see the iProxy section above) and run
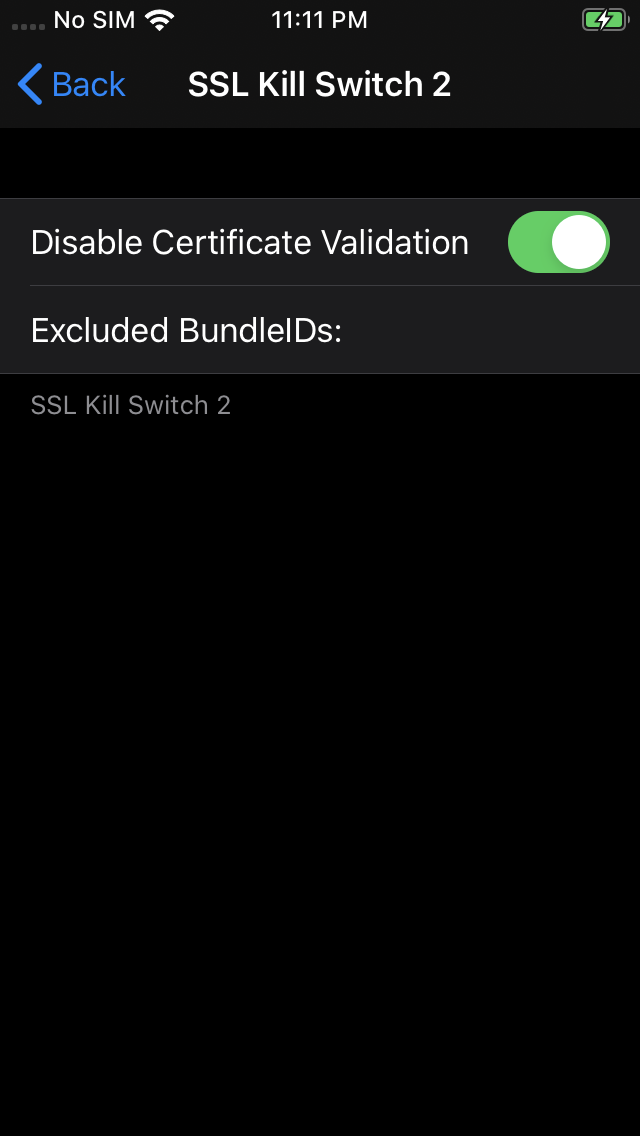
wget <RELEASE URL FROM STEP 2>→dpkg -i <DOWNLOADED PACKAGE NAME>→killall -HUP SpringBoard→rm <DOWNLOADED PACKAGE NAME> - On your iPhone, go to Settings → SSL Kill Switch 2 (it should be at the bottom) → Disable Certificate Validation
You should be good to go.
Bypass Jailbreak Detection 🔗
Jailbreak detection is annoying but solvable. Of all the packages that support iOS 13, I’ve found that the Liberty Lite Cydia module works the most consistently.
- On your iPhone, open Cydia and add module author Ryley Angus’ repository by going to Sources → Edit → Add and enter
https://ryleyangus.com/repo/ - Go to Search → Enter
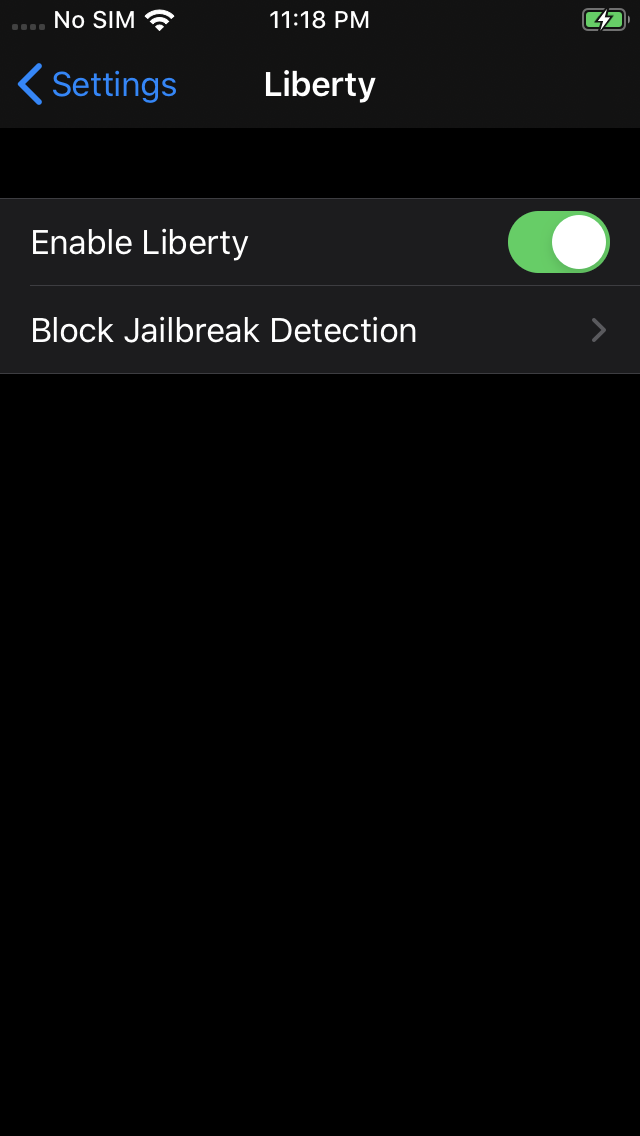
Liberty Lite→ Install - Once installed, go to Settings → Liberty → Block Jailbreak Detection → Enable for the app you want to bypass
Kill and re-open your app. If it’s still not bypassed, you can try other modules.
Dump App Files 🔗
Unlike Android apk files, iOS apps are stored as encrypted ipa files, preventing easy access and analysis. Having installed iproxy and Frida, we can use frida-ios-dump to do this at runtime.
- On your macOS device,
git clone https://github.com/AloneMonkey/frida-ios-dump.git && cd frida-ios-dump sudo pip3 install -r requirements.txt --upgrade- In another terminal, run
iproxy 2222 22if it’s not already running - To dump an app’s file,
./dump.py <APP DISPLAY NAME OR BUNDLE IDENTIFIER>
Typically, I like to symlink to my tools so it’s easily accessible from my PATH with ln -s <ABSOLUTE PATH TO dump.py> /usr/local/bin/dump-ipa. Now whenever I want to dump an app I can use the dump-ipa command anywhere.
Conclusion 🔗
With this quickstart guide, you now have the basic tools set up to begin iOS app pentesting, from searching for secrets in the app files, to hooking classes, and of course testing the web API. Best of all, this is on modern iOS hardware and versions.
I hope this guide is helpful for those looking to set up their iOS testing labs. I will be following up with a writeup on several bugs I’ve found with these tools and hopefully point towards typical issues to look out for.